10 Voluminous Crown Layers Over 40 Haircut Ideas
Incorporating voluminous crown layers into haircuts is an effective method for women over 40 to counteract natural density loss, enhance facial symmetry, and establish lasting root elevation. As hair fibers mature, physiological shifts often decrease strand diameter, natural sebum production, and follicle elasticity, causing single-length silhouettes to lie flat against the scalp. Strategically placed crown layers redistribute overall hair weight, creating internal scaffolding that lifts the apex and adds multi-dimensional movement to the entire hairstyle. This detailed guide explores ten versatile haircuts optimized with specialized crown layering techniques suited for various lengths, face shapes, and mature textures. Readers will learn the geometrical principles of vertical elevation, point-cutting angles, interior weight debulking, and facial contouring that define modern styling. Mastering these structural cutting methods allows individuals to lift drooping features visually, elongate rounder facial profiles, and simplify daily hair care regimens. With accurate sectioning and deliberate elevation, voluminous crown layers restore youthful bounce, structural lightness, and sophisticated elegance to mature hair without requiring excessive heat styling.
Why This Idea Is Trending or Useful
Voluminous crown layers have become a staple across modern Pinterest inspiration boards because they blend functional volume building with contemporary aesthetic appeal. Rather than relying on outdated teasing methods, rigid styling sprays, or harsh chemical perms to manufacture fullness, modern crown layering techniques build natural body directly into the architecture of the haircut. This structural design provides an accessible, beginner friendly approach for women seeking an effortless, wash-and-go morning routine that remains polished throughout the day. Modern design movements favor organic textures, soft movement, and touchable separation over stiff, high-maintenance hair shapes. The practical value of crown layering lies in its adaptability to diverse hair densities; fine strands receive crucial root support from shorter under-layers, while dense, coarse hair sheds cumbersome downward weight to gain fluid movement. The DIY appeal of quick, low-maintenance home styling, combined with balanced grow-out phases that preserve the cut’s shape between appointments, makes these haircuts a practical, sustainable choice for women over 40.
Materials and Preparation
Executing balanced, voluminous crown layers requires professional cutting implements, sectioning tools, and weightless preparation formulas designed to preserve strand alignment. Essential hardware includes Japanese steel cutting shears measuring 5.5 to 6.0 inches for precise geometric detailing, a guarded feather razor for soft perimeter texturizing, fine-tooth carbon fiber combs for consistent tension control, and duckbill sectioning clips. Thinning shears featuring 20 to 28 teeth are vital for selective weight removal without disrupting the primary baseline. Proper preparation begins with a gentle clarifying wash to remove product residue, followed by a lightweight, protein-enriched conditioner applied strictly to mid-lengths and ends to avoid weighing down the roots. Establishing baseline lengths and perimeter boundaries should be mapped out while the hair is evenly damp to maintain consistent tension, but crown layering, diagonal fringe carving, and weight softening should be finalized on completely dry hair to observe natural growth directions, whorls, and cowlicks. Planning considerations require analyzing natural hair recession lines, apex density, skull contours, and daily styling habits to avoid over-shortening sensitive crown zones.
Tailored Voluminous Crown Layer Haircuts for Women Over 40
Idea 1: Cascading Crown-Layered Collarbone Lob
Step-by-Step Guide
The cascading crown-layered collarbone lob relies on an architectural silhouette that balances a solid clavicle-length baseline with dynamic, vertical crown elevation. The perimeter rests firmly along the collarbones, establishing a dense outline that makes mature, thinning ends appear thick and healthy. The crown is cut into cascading, multi-tiered layers that start near the cheekbones, removing mid-length heaviness and pushing the apex upward into a rounded, buoyant shape. This vertical lift visually elongates the neck and draws attention toward the eyes, counteracting soft jawlines and flat roots. Straight and wavy textures benefit from this balanced layout, as the shorter interior layers allow the surface strands to move independently without collapsing against the perimeter.
To create this haircut, start on clean, damp hair by sectioning a center parting from the frontal hairline back to the crown, dividing the head into four balanced quadrants. Establish the perimeter baseline at the collarbones using blunt point cutting with low tension to maintain maximum density. Isolate the crown area by carving a circular section around the vertex, lifting horizontal subsections vertically to 90 degrees from the scalp. Cut across a traveling guideline using deep point cutting to build structural, weightless interior tiers. Blend the top crown layers into the side perimeters using diagonal-forward slide cutting to preserve length around the front. Blow-dry the hair with a medium ceramic round brush, lifting the crown roots upward at a 90-degree angle. Finish the style on dry hair by texturizing the interior crown ends with thinning shears to ensure smooth strand separation.
 SAVE TO PINTEREST
Idea 2: High-Lift Textured Pixie with Stacked Crown Layers
Execution Process
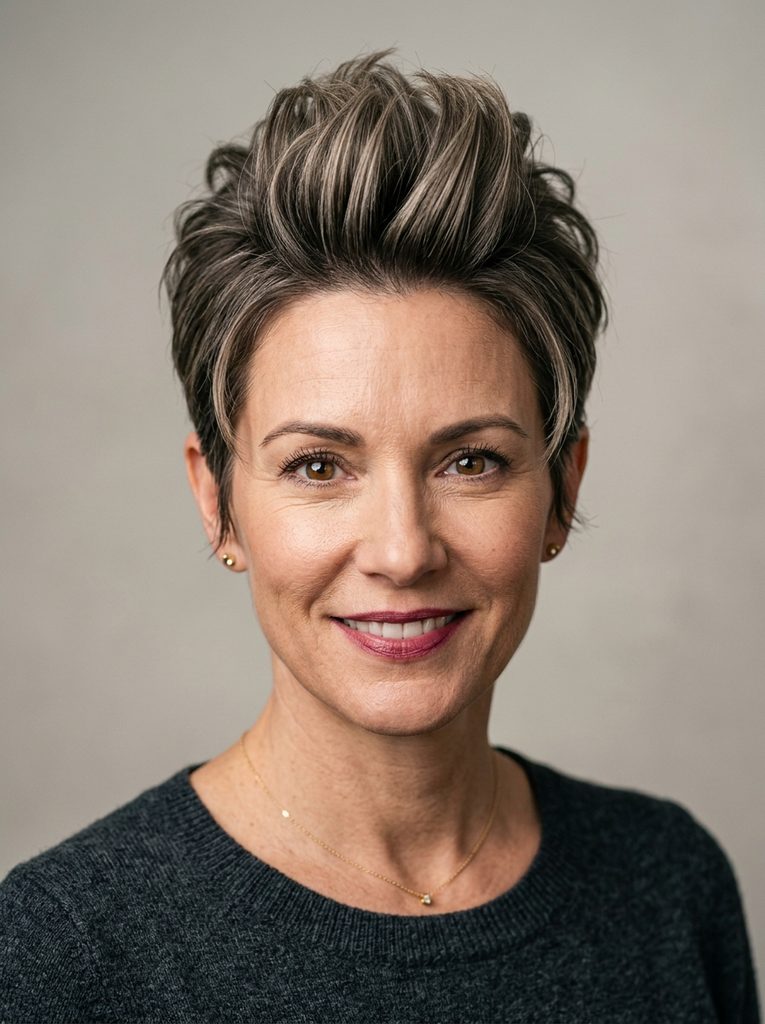
The high-lift textured pixie with stacked crown layers is a short crop engineered to shift visual weight entirely upward toward the top of the head. The sides and nape are tailored with clean graduation, hugging the scalp to eliminate bulk around the ears and neck. In contrast, the crown is left significantly longer and cut into tightly stacked, vertical tiers that stand off the head with minimal intervention. These stacked interior layers act as physical supports, lifting one another to generate lasting height across the vertex. The hairline around the temples is softly feathered to maintain a gentle, feminine contour that flatters mature facial features. This haircut provides an instant visual lift, making it an exceptional choice for fine, limp hair textures requiring effortless morning styling.
Begin on damp hair by isolating a horseshoe parting from the temporal recession points around to the occipital bone, securing the crown hair away. Work through the lower back and sides using a shear-over-comb method, tapering the hair close to the skull while following the natural contours of the head. Release the horseshoe crown section and divide it into half-inch horizontal subsections. Elevate each panel vertically to 180 degrees and execute deep notch cutting to produce textured, varied lengths across the vertex. Blend the crown downward into the tapered sides by lightly over-directing the parietal ridge upward. Blow-dry the crown using a small vent brush, directing warm airflow at the roots to maximize lift. Complete the cut dry by applying a pea-sized amount of matte texturizing paste, pinching the crown layers into defined vertical peaks.
 SAVE TO PINTEREST
Idea 3: Feathered Italian Bob with Buoyant Apex Volume
How to Create
The feathered Italian bob with buoyant apex volume combines structured perimeter weight with airy, touchable surface movement. Unlike rigid blunt cuts, this style features chunky, feathered perimeter ends and subtle internal beveling that allow the hair to be flipped casually from side to side. The baseline rests along the lower jawline, providing density that frames the face cleanly. The crown is carved with circular layers that introduce buoyant root elevation without compromising the solid perimeter outline. This combination adds vertical height at the top while maintaining density at the base, balancing round and heart-shaped face profiles. For women over 40, this style delivers a luxurious European aesthetic that looks full-bodied, healthy, and effortless when air-dried or given a quick blowout.
Initiate the haircut on clean, towel-dried hair by establishing a perimeter line along the jaw using blunt point cutting, angling slightly downward toward the front corners. Take horizontal subsections up the back of the head, holding them at a low 15-degree elevation to build soft graduation and weight along the baseline. Isolate the crown in a circular parting centered at the apex; lift these top strands vertically to 90 degrees and point cut the ends deeply to create invisible internal movement that prevents the top from lying flat. Blow-dry the hair using a large ceramic round brush, lifting the roots vertically to create rounded fullness. Once dry, flip the parting deeply to one side to maximize natural volume, and use texturizing shears lightly on the interior ends to ensure the layers maintain flexible bounce.
 SAVE TO PINTEREST
Idea 4: Modern Shag with Concentrated Crown Tiering
How to Make
The modern shag with concentrated crown tiering is a texture-driven haircut that merges the layered energy of a vintage shag with modern, weightless perimeters. This cut features short, heavily layered tiers concentrated exclusively around the crown and parietal ridge, creating maximum vertical height and width across the upper half of the head. Below the occipital ridge, the hair transitions into longer, razor-thinned layers that drape softly around the shoulders. The contrast between the voluminous upper cap and the wispy lower lengths creates an elongating effect on the neck while drawing focus toward the cheekbones. This cut revitalizes mature hair by removing dragging downward weight, making it an exceptional option for thick, wavy, or coarse textures seeking dynamic movement.
Start on damp hair by isolating the crown zone above the occipital ridge and securing the lower perimeter. In the upper zone, lift horizontal partings straight up at 90 degrees, using deep notch cutting along a square guide to build dense, buoyant volume across the top and sides. Cut a textured bottleneck fringe that blends directly into these rounded crown layers. Release the lower perimeter zone and drop the elevation to zero degrees; use a guarded razor to remove internal mass, leaving thin, elongated strands that fall softly past the collarbones. Blow-dry the crown using a diffuser or directional nozzle, using your fingers to lift the roots off the scalp. Apply a light sea salt mist through the mid-lengths, scrunching with hands to define the sharp contrast between the voluminous crown and airy baseline.
 SAVE TO PINTEREST
Idea 5: Voluminous Face-Framing Butterfly Cut for Mid-Lengths
Setup Method
The voluminous face-framing butterfly cut utilizes graduated, cascading tiers that sweep away from the face to create dynamic, wing-like volume. This mid-length style incorporates short, buoyant layers across the crown that transition into longer, feathered tiers resting past the shoulders. The upper crown layers focus on building rounded height at the vertex, while the lateral layers flare outward gracefully around the cheekbones and jawline. This structural distribution introduces air pockets between hair strands, preventing straight or fine mature textures from clinging to the sides of the face. The result is a soft, multi-dimensional silhouette that frames facial features with flattering, sweeping curves while maintaining substantial overall length.
Begin by sectioning the hair horizontally across the crown, separating the upper volume zone from the lower perimeter. Secure the bottom section and focus on the top tier by creating a central guide at the apex; lift this hair straight upward at 180 degrees and point cut horizontally to establish short, buoyant crown layers. Release the lower perimeter, establishing the baseline past the shoulders with blunt texturizing cuts to maintain a soft edge. Connect the top and bottom tiers by taking vertical-diagonal subsections around the face, pulling each section forward toward the nose and slide cutting downward from cheekbone length to the perimeter. Blow-dry the hair using a medium round ceramic brush, rolling the facial layers outward and the crown layers backward. Once dry, notch deeply into the ends of each tier to encourage separate, outward-flaring wings.
 SAVE TO PINTEREST
Idea 6: Rounded French Crop with Elevated Apex Layers
Step-by-Step Guide
The rounded French crop with elevated apex layers is a timeless, spherical short cut designed to provide consistent fullness across fine or thinning mature hair. This haircut follows the natural curvature of the skull, avoiding sharp corners and creating a continuous, rounded flow of movement. The lower perimeter is softly graduated around the ears and nape, while the crown is carved with elevated, circular layers that stand off the scalp. The accompanying brow-grazing fringe is cut with soft transparency, arching over the eyebrows to frame the eyes without shortening the face. This cut is especially beneficial for women over 40 experiencing diffuse thinning, as the spherical architecture creates the optical illusion of uniform density and all-over body from every angle.
Initiate the cut on damp hair by sectioning the head into four balanced quadrants. Begin at the nape, taking horizontal subsections and lifting them at a 45-degree angle, cutting along a rounded traveling guide to build soft graduation through the lower hairline. Work upward toward the occipital bone, gradually increasing the elevation to 90 degrees to blend the posterior graduation with the upper crown. Move to the sides, elevating vertical panels to 90 degrees and connecting them to the posterior layers with slight over-direction backward. Isolate the fringe area and cut a soft, arched fringe dry using vertical point snips. Blow-dry the entire head with a small boar-bristle brush, rolling the hair gently under to establish a smooth contour. Finish on dry hair by using texturizing shears across the crown surface to ensure airy separation.
 SAVE TO PINTEREST
Idea 7: Graduated Stacked Bob with Lifted Crown Architecture
Execution Process
The graduated stacked bob with lifted crown architecture is a precision-cut hairstyle designed to maximize volume at the back of the head while framing the jawline with an angled slope. The rear profile features precise, stacked layers cut close against the nape, creating a dense shelf of volume at the occipital ridge. The crown layers are elevated vertically above this shelf, allowing the top hair to drape smoothly over the graduated base with buoyant lift. The front panels extend forward in a clean diagonal line that sharpens the jawline and visually elongates the neck. This cut is ideal for mature women with fine to medium hair, as the mechanical stacking of the lower layers physically pushes the crown upward, providing long-lasting fullness without daily backcombing.
Begin the haircut on damp hair by establishing a clean center or side part based on client preference. Isolate the lower nape from mastoid to mastoid and use vertical partings held at a 45-degree elevation, cutting with precise point cuts to build a stacked graduation that hugs the neck. Continue working upward toward the occipital bone, gradually increasing the elevation to 90 degrees to blend the stacked nape into the upper crown layers. Angle the lateral sections forward, cutting along a diagonal guideline that extends past the jawline. On dry hair, lift the top crown panels to 90 degrees and point cut across the surface to blend the top with the graduation. Blow-dry the back with a vent brush, directing airflow upward to maximize the lift of the graduated shelf, and finish with a light mist of hairspray.
 SAVE TO PINTEREST
Idea 8: Wispy Layered Bixie with Multi-Directional Crown Lift
How to Create
The wispy layered bixie merges the cropped ease of a pixie with the perimeter coverage of a short bob, resting softly between the earlobe and the jaw. The crown is cut into multi-directional, feathered layers that can be tousled for height or smoothed down for a tailored silhouette. These lightweight crown layers remove drag from the top of the head, allowing natural root volume to flourish. The perimeter features delicate, razor-feathered tendrils that hug the neck and frame the cheekbones, preventing a blocky or severe outline. For women over 40, this cut offers a gentle, flattering transition to shorter hair, providing the comfort of face-framing length alongside the structural lift and ease of a cropped crown.
Start on damp hair by isolating the crown with an oval parting centered at the vertex, securing the top hair. Use a shear-over-comb method along the lower nape and sides to create a soft, graduated taper that contours the hairline cleanly without clipper lines. Release the crown section, lifting horizontal partings vertically to 90 degrees from the scalp. Execute deep notch cutting across a traveling guide to produce textured, varied lengths that support multi-directional root lift. Connect the crown to the front perimeters using diagonal-forward slide cutting to preserve softness around the jaw. Blow-dry the entire shape using a flat vent brush, sweeping the hair in alternating directions across the scalp. Finalize by misting a light dry texturizing spray through the mid-lengths to enhance piecey separation.
 SAVE TO PINTEREST
Idea 9: Angled Asymmetrical Bob with Volumized Crown Veil
How to Make
The angled asymmetrical bob with a volumized crown veil uses geometric asymmetry to break up facial roundness and inject dramatic lift into mature hair. One side of the cut is tailored to graze the lower earlobe, while the opposite side extends downward in an angled, razor-feathered line past the chin. The crown features an elevated veil of layers that sweeps diagonally across the top of the head, redistributing weight from the lighter side to the heavier side. This directional shift generates instant root elevation at the parting line, drawing the eye upward and across the face to create an elongating contour. This style delivers an executive, modern aesthetic that sharpens soft jawlines while providing touchable, full-bodied crown volume.
Establish a deep side parting on damp hair, aligned with the outer arch of the client’s eyebrow. On the shallow side, cut the perimeter along the earlobe using zero-elevation point cutting to create a soft, neat edge. On the longer side, angle the baseline diagonally downward toward the collarbone along a steep diagonal-forward guide. Elevate the interior crown sections to 90 degrees and use slide cutting through the mid-lengths to debulk the interior without compromising the asymmetrical outline. Blow-dry the cut with a large round ceramic brush, rolling the crown layers away from the face to create soft, touchable volume. Complete the cut dry by detailing the longer front points with thinning shears to ensure a lightweight, fluid drape that moves freely.
 SAVE TO PINTEREST
Idea 10: Collarbone Shag with Disconnected Crown Canopy
Setup Method
The collarbone shag with a disconnected crown canopy is an edgy yet refined haircut that pairs an elongated clavicle-grazing perimeter with an independent, highly layered crown cap. The crown layers are cut with deliberate disconnection from the lower lengths, forming a rounded canopy of volume that sits atop the sleek, textured base. This disconnection allows the crown to achieve maximum height and movement without removing essential density from the perimeter ends. The front is detailed with curtain bangs that blend into the crown canopy, framing the eyes and cheekbones. For women over 40 with thick or dense hair, this haircut removes unmanageable interior weight while delivering a youthful, high-impact silhouette that requires minimal heat styling.
Begin on damp hair by dividing the head into two distinct zones: the upper crown canopy above the parietal ridge and the lower length zone below it. Secure the crown away and establish the perimeter at the collarbones using zero-elevation razor slicing to create a feathered edge. Release the crown canopy, lifting horizontal panels straight up to 180 degrees from the top of the head. Point cut across a square guide to establish short, self-supporting crown tiers that stand independently from the lower lengths. Cut the curtain fringe dry, starting at the bridge of the nose and slide cutting outward to the cheekbones. Blow-dry the crown forward and upward using a vent brush and directional heat. Finish by applying a texturizing powder at the crown roots, tousling with fingers to lock in vertical lift.
 SAVE TO PINTEREST
Common Beginner Mistakes and How to Avoid Them
A frequent error when executing crown layers on women over 40 is cutting the top layers too short, which can cause fine mature hair to stand straight upright rather than falling into a soft, rounded shape. Stylists must always measure the drop of the shortest crown layer against the curvature of the parietal ridge before removing length. Another common mistake is over-thinning the perimeter with aggressive texturizing shears, which strips away essential baseline density and leaves the bottom looking stringy and weak. To prevent this, always establish a solid perimeter foundation before carving internal layers. Additionally, cutting heavy, blunt horizontal lines across the crown can create visible ledges that fail to blend smoothly with the surrounding hair. Stylists should utilize vertical point cutting or channel slide cutting to ensure seamless transitions. Finally, failing to evaluate natural growth whorls and crown cowlicks on dry hair before cutting can result in awkward splits and misaligned volume once the hair is styled.
Practical Tips for Better Results
Achieving long-lasting volume with crown layers relies on using proper drying methods and lightweight styling products that provide hold without weighing down mature hair fibers. When blow-drying, use a flat-wrap technique—brushing the crown hair across the scalp in alternating directions with a vent or paddle brush. This neutralizes natural cowlicks, flattens the cuticle, and distributes root volume evenly across the vertex. Avoid heavy waxes, dense pomades, and silicone-heavy oils, as these formulations coat fine hair fibers, causing the layers to clump into flat, separated sections. Instead, prioritize lightweight styling options such as dry texturizing sprays, root-lifting mousses, and matte volumizing powders applied directly to the scalp. When detailing face-framing pieces, apply a micro-drop of lightweight serum to your fingertips and lightly pinch only the ends to emphasize razor separation. To refresh the cut between washes without wetting the entire head, mist the crown with water, apply dry shampoo to absorb excess oils, and blow-dry the root area upside down for thirty seconds to instantly restore volume.
Styling, Presentation, or Organization Ideas
Organizing a dedicated daily styling station ensures that maintaining voluminous crown layers remains quick, effortless, and consistent every morning. Keep essential styling tools neatly arranged: a lightweight ionic hairdryer with a precision concentrator nozzle, a medium ceramic round brush for fringe shaping, a wide-tooth comb for wet detangling, and a multi-directional vent brush for root elevation. Group styling products according to their application stage: root-lifting mousses for damp prep, heat protectants for blow-drying, and dry texturizing sprays for final finishing. For a polished, professional presentation, style bobs and lobs with a sleek, tucked finish—tucking one side behind the ear to expose the jawline while allowing the voluminous crown to drape forward naturally. For an everyday relaxed look, rough-dry the hair using only hands and directional airflow, finishing with a light dusting of volumizing powder at the crown to lock in height. This systematic approach ensures your haircut looks intentional, modern, and aligned with current aesthetic trends.
Budget or Time Planning
Maintaining precision crown layers requires realistic time allocation and financial planning to keep structural lines sharp and root volume balanced. An initial haircut transformation at a salon typically requires 45 to 60 minutes, allowing sufficient time for consultation, wet baseline mapping, drying, and detailed dry texturizing. Because shorter crown layers reveal growth quickly as they lose vertical lift, layered cuts require maintenance trims every 6 to 8 weeks to preserve apex volume and keep the perimeter neat. Shorter pixies and cropped bixies may require maintenance trims every 4 to 6 weeks to keep the neckline tailored. To optimize personal grooming budgets, schedule full haircut appointments every other visit, utilizing quick, low-cost “fringe and crown cleanup” services in between. Daily styling is exceptionally time-efficient, requiring only 10 to 15 minutes when using the correct prep products and drying techniques. Investing in high-quality professional home tools, such as an ionic dryer and ceramic brushes, reduces daily styling time while preserving hair health over the long term.
Creative Expansion and Advanced Inspiration
Once the foundational crown-layered haircut is established, women over 40 can explore advanced color placements and subtle texture variations to further enhance the cut’s multi-dimensional architecture. Dimensional color techniques work hand-in-hand with structural cuts; incorporating delicate baby-lights, face-framing highlights, or subtle balayage creates contrasting depth that visually separates individual layers. Placing brighter tones around the crown and fringe draws the eye upward, accentuating vertical height, while deeper lowlights beneath the occipital bone create shadows that define the neckline. Mature women embracing natural gray or silver hair can incorporate clear gloss treatments or violet-toning glazes to enhance shine and give the layered cut a luminous finish. For special occasions, experiment with subtle parting shifts—moving a center part an inch to the side to introduce instant diagonal asymmetry. Minimalist hair accessories, such as architectural metal bobby pins or sleek barrettes placed along the tucked side of a bob, provide a sophisticated touch that highlights the jawline with understated refinement.