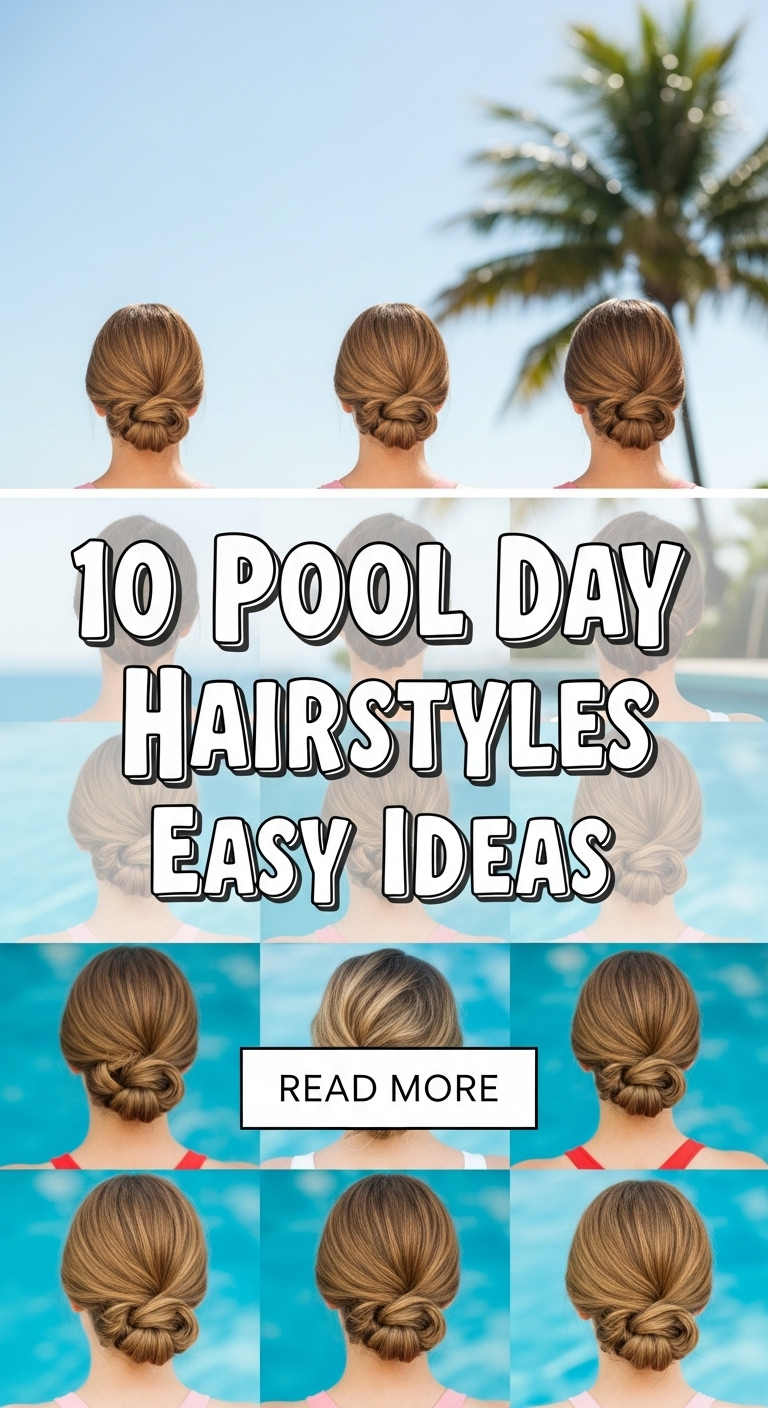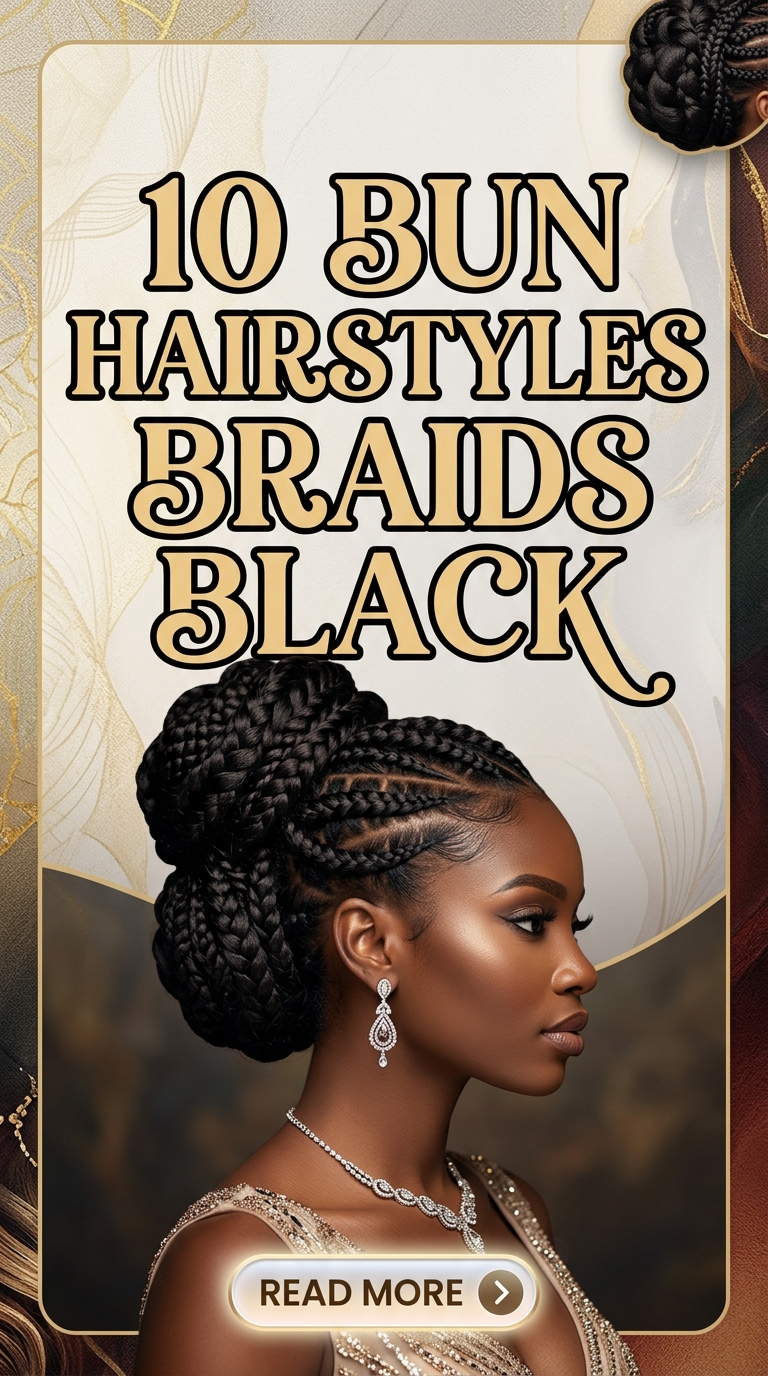
10 bun hairstyles braids black

Braided bun hairstyles for Black hair have become a widely shared topic across Pinterest ideas because they combine protective styling with elegant structure. A bun hairstyle gathers the hair into a rounded form while braids add definition, durability, and texture. This combination creates a hairstyle that remains visually striking while protecting natural hair from excessive manipulation. Many braided bun styles also support long-term wear, making them practical for individuals who want a hairstyle that remains neat and manageable over time.
The aesthetic appeal of braided buns comes from the visible patterns formed by the braids themselves. Cornrows, box braids, and twist braids can all be shaped into buns that highlight the braid texture. These styles often appear on Pinterest inspiration boards because they photograph well and clearly display the intricate structure of the braids.
This article explores ten braided bun hairstyle ideas designed specifically for Black hair textures. Each style explains the design concept and provides clear step by step guidance for creating the hairstyle. These ideas range from simple everyday buns to more decorative braided bun variations. The goal is to present creative ideas that balance beauty, practicality, and protective hair care.
Braided bun hairstyles remain useful because they organize hair efficiently while allowing braid patterns to become a central design element. With proper preparation and technique, these styles can function as both practical and expressive hairstyles.
Why This Idea Is Trending or Useful
Braided bun hairstyles continue to trend across Pinterest inspiration collections because they combine traditional braiding techniques with modern styling approaches. Protective styling is a major factor in the popularity of these hairstyles. Braids reduce daily manipulation of natural hair, which helps minimize breakage and maintain healthy hair growth. When these braids are gathered into buns, the hairstyle becomes even more practical by keeping the hair securely arranged throughout the day.
Another reason for the popularity of braided buns is their versatility. The bun can be positioned high on the crown, low at the nape, or slightly to the side depending on the desired look. Each placement creates a different visual effect while maintaining the protective nature of the braids. This flexibility allows individuals to adapt the style to casual environments, professional settings, or formal occasions.
DIY appeal also contributes to the trend. Many braided bun styles can be recreated at home with basic tools and clear tutorials. Once the braids are installed, forming a bun becomes an easy project that can be completed quickly.
The visual impact of braided buns is another key factor. The braid patterns create texture and structure that enhance the overall hairstyle. These details are often highlighted in trending ideas because they combine artistic expression with functional hair care.
Materials and Preparation
Preparing to create braided bun hairstyles requires organizing essential materials and ensuring that the hair is properly prepared for braiding. The first preparation step is washing and conditioning the hair. Clean hair allows braids to appear more defined and helps maintain scalp health during protective styling. After washing, the hair should be thoroughly detangled using a wide-tooth comb to remove knots.
Common materials used in braided bun hairstyles include braiding hair extensions, sectioning clips, hair ties, and bobby pins. Braiding hair extensions are often used to increase braid length and thickness. Sectioning clips help divide the hair into manageable parts during the braiding process. Hair ties and pins are used later to secure the bun once the braids are complete.
A rat-tail comb is useful for creating precise part lines when forming braid sections. These clean parts contribute to the overall visual structure of the hairstyle. Lightweight hair oils or scalp moisturizers may also be applied to maintain hydration during long-term wear.
Planning the braid pattern is another important preparation step. Cornrows, box braids, or twists may be arranged depending on the desired bun style. Once the braids are installed, the hair can be gathered and shaped into the bun structure. Careful preparation ensures the final hairstyle remains balanced, secure, and visually polished.
MAIN IDEAS
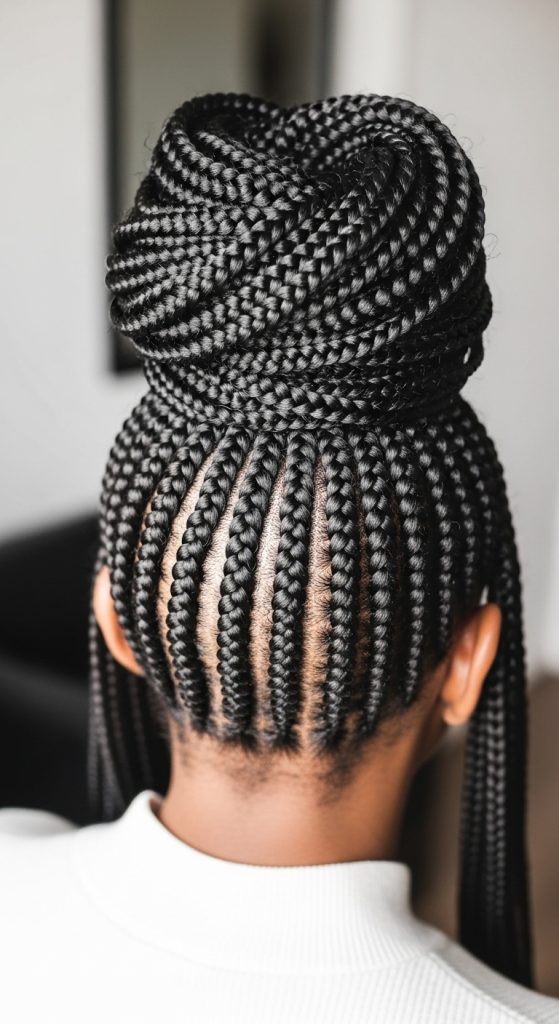
Idea 1: High Braided Bun with Cornrows
How to Create
The high braided bun with cornrows is one of the most recognizable braided bun hairstyles. This style begins with cornrows braided upward from the hairline toward the crown of the head. The braids converge at the top of the head, where they are gathered into a rounded bun. This arrangement highlights the geometric patterns of the cornrows while creating a strong vertical silhouette.

Pinterest inspiration boards frequently feature this hairstyle because the cornrow pattern adds visual structure across the scalp. The braids form clean lines that lead toward the bun, which becomes the focal point of the hairstyle. This style is especially effective for showcasing intricate braid parting patterns.
Another advantage of this hairstyle is its practicality. Cornrows keep the hair tightly braided against the scalp, which helps maintain the hairstyle during physical activity or long days. The high bun also keeps the hair away from the neck and shoulders, making the style comfortable in warm environments.
Step-by-Step Guide
Begin by parting the hair into sections using a rat-tail comb. Create cornrow braids that move upward toward the crown of the head. Each braid should follow a straight or slightly curved line depending on the desired design.
Continue braiding until all cornrows meet at the crown. Gather the braid ends together and secure them with a strong hair tie.
Twist the gathered braids together and wrap them around the base of the ponytail to form the bun shape.
Secure the bun using bobby pins placed around the base. Adjust the braids slightly so the bun appears symmetrical and balanced.
Idea 2: Low Braided Bun with Box Braids
How to Make

The low braided bun with box braids is a classic protective hairstyle that combines the neat structure of box braids with a low bun placement. Box braids are individual braids created from square-shaped sections of hair. When these braids are gathered at the nape of the neck and wrapped into a bun, they create a compact and elegant hairstyle.
This style appears frequently among Pinterest ideas because the box braid texture forms a visually detailed bun. Each braid contributes to the layered appearance of the bun structure. The result is a hairstyle that appears both organized and textured.
The low bun placement also creates a refined aesthetic. It sits naturally at the base of the head, which complements many face shapes and outfits. The style works well in professional environments because it appears polished and controlled.
Step-by-Step Guide
Start by installing box braids throughout the hair using evenly sized square sections.
Once the braids are complete, gather them at the nape of the neck and secure them with a hair tie.
Twist the braids together and wrap them around the base to form a low bun.
Secure the bun using several bobby pins inserted around the base of the braids.
Idea 3: Braided Top Knot Bun with Box Braids
How to Create
The braided top knot bun with box braids is a bold hairstyle that gathers long box braids into a high bun positioned at the crown of the head. The top knot structure creates height and highlights the layered pattern of the braids as they wrap around each other. Because box braids are thicker than natural hair strands, the bun appears full and structured. This makes the hairstyle visually striking while still maintaining the protective qualities associated with braided styles.
Pinterest inspiration boards frequently feature braided top knot buns because they create a strong silhouette. The height of the bun draws attention upward and highlights facial features such as the cheekbones and eyes. The braided texture also creates a visible spiral pattern as the braids wrap around the bun.
Another advantage of the top knot braided bun is its practicality. The braids remain secured at the crown of the head, preventing them from interfering with daily activities. This makes the style especially useful for individuals with long braids who want a hairstyle that feels lightweight and organized.
Step-by-Step Guide
Begin by brushing or smoothing the braids upward toward the crown of the head. Gather all braids into a high ponytail and secure them with a strong hair tie.
Divide the braids slightly to make twisting easier. Twist the braids together gently to create a rope-like structure.
Wrap the twisted braids around the base of the ponytail to form a circular bun at the crown of the head.
Secure the bun with bobby pins placed evenly around the base. Adjust the braids slightly so the bun appears balanced and symmetrical.
Idea 4: Cornrow Braided Low Bun

Execution Process
The cornrow braided low bun combines scalp braiding with a classic bun structure positioned near the nape of the neck. Cornrows are braided closely against the scalp in straight or curved lines. In this style, the cornrows are directed toward the back of the head where they gather into a low bun. The cornrow pattern becomes a decorative design element that enhances the hairstyle.
This style appears frequently among Pinterest ideas because the cornrow pattern creates a clean and organized appearance across the scalp. The lines of the braids guide the eye toward the bun, which becomes the focal point of the hairstyle. The combination of structured braids and a soft bun creates a balanced visual effect.
The cornrow low bun is also highly practical. Cornrows protect the hair by keeping it neatly braided against the scalp, while the bun gathers the braid ends into a compact shape. This combination helps maintain the hairstyle for extended periods.
Step-by-Step Guide
Start by dividing the hair into several sections using a rat-tail comb. Create cornrow braids that move toward the back of the head.
Continue braiding until all cornrows meet at the nape of the neck. Gather the braid ends into a ponytail.
Twist the gathered braids together and wrap them around the base of the ponytail to create the bun.
Secure the bun with pins placed around the base so the braids remain stable.
Idea 5: Braided Side Bun with Twists
How to Make

The braided side bun with twists introduces asymmetry to the traditional braided bun hairstyle. Instead of positioning the bun at the center back of the head, the bun is placed slightly to one side. Twist braids are often used for this style because their rope-like texture wraps smoothly into a bun shape. The side placement creates a softer silhouette that appears elegant and distinctive.
Pinterest inspiration boards often highlight side buns because they frame the face differently than central buns. The side placement creates visual movement across the hairstyle. The twist braids also add texture that makes the bun appear layered and detailed.
Another advantage of the braided side bun is its versatility. The style works well for both everyday wear and formal occasions. The twist braids remain protective while the bun organizes the hair neatly.
Step-by-Step Guide
Begin by creating twist braids throughout the hair. Each twist should be consistent in thickness.
Gather the twist braids toward one side of the head near the nape.
Secure the braids with a hair tie to create a side ponytail.
Wrap the twist braids around the base of the ponytail to form the side bun and secure with pins.
Idea 6: Large Braided Crown Bun
Setup Method

The large braided crown bun is a dramatic hairstyle that gathers braids into a full bun positioned near the top of the head. The bun appears larger because multiple braids are wrapped around the base in layers. This creates a crown-like shape that sits prominently at the crown of the head.
This style appears frequently in Pinterest inspiration collections because it creates a powerful visual statement. The layered braids form a rounded shape that resembles a crown, which gives the hairstyle a regal appearance.
The crown bun also distributes the braids evenly around the head, which prevents the hairstyle from feeling heavy on one side. The symmetrical structure helps maintain balance while keeping the hair organized.
Step-by-Step Guide
Gather the braids at the crown of the head and secure them into a ponytail.
Divide the braids into several groups to make wrapping easier.
Wrap each group of braids around the base to create layered circles.
Secure the bun with multiple pins until the bun feels stable.
Idea 7: Braided Bun with Feed-In Cornrows
How to Create
Feed-in cornrows are braids where additional hair is gradually added to the braid as it progresses. This technique creates braids that appear natural at the scalp and gradually become thicker. When these feed-in cornrows are gathered into a bun, the hairstyle creates a smooth transition from scalp braids to bun structure.

Step-by-Step Guide
Create feed-in cornrows moving toward the crown of the head.
Gather braid ends into a ponytail and wrap into bun.
Secure with pins.
Idea 8: Double Braided Bun
How to Make
The double braided bun divides braids into two sections and forms two buns instead of one. This style introduces a playful variation while maintaining protective braiding.

Step-by-Step Guide
Divide braids into two sections.
Wrap each section into a bun and secure with pins.
Idea 9: Braided Bun with Patterned Parts
How to Create
Patterned part braids emphasize decorative scalp designs before forming the bun.
Step-by-Step Guide
Create creative part patterns.
Braid sections and gather into bun.

Idea 10: Twisted Braided Bun with Accessories
How to Create
This style combines twist braids with decorative accessories such as cuffs or beads.
Step-by-Step Guide
Create twist braids.

Wrap into bun and attach accessories.
Common Beginner Mistakes and How to Avoid Them
One common mistake when creating braided bun hairstyles is uneven braid tension. When some braids are tighter than others, the bun may appear unbalanced and the scalp may experience unnecessary strain. Maintaining consistent braid tension ensures that the hairstyle remains comfortable and visually symmetrical. Another mistake involves gathering the braids without smoothing them first. Braids that are not evenly gathered may create gaps or uneven layers within the bun.
Using too few pins is another frequent issue. Braided buns require multiple pins to hold the weight of the braids securely. Without proper pin placement, the bun may loosen during the day.
Improper sectioning during the braiding process can also affect the final hairstyle. Uneven braid sizes may create a bun that appears irregular. Taking time to create clean and consistent sections helps maintain a polished appearance.
Finally, neglecting scalp care can cause dryness or irritation. Applying light scalp oils helps maintain comfort while wearing braided protective styles.
Practical Tips for Better Results
Achieving a well-structured braided bun often depends on careful preparation. Sectioning the hair before braiding helps maintain consistent braid sizes. Clean parts created with a rat-tail comb improve the overall appearance of the hairstyle.
Using lightweight braiding hair extensions can help maintain a natural look while reducing tension on the scalp. Proper pin placement also improves stability. Pins should be inserted in different directions to anchor the bun securely.
Regular scalp care also improves the long-term appearance of braided styles. Applying small amounts of scalp oil helps maintain hydration and reduce dryness.
Protecting the hair during sleep is another important step. Wrapping the hair with a satin scarf or bonnet helps maintain the shape of the braids and prevents frizz.
Styling, Presentation, or Organization Ideas
Braided bun hairstyles can be styled with subtle accessories that complement the braid patterns. Hair cuffs, beads, and decorative pins add visual detail without overwhelming the hairstyle.
Positioning the bun carefully also enhances the presentation. High buns create a bold silhouette, while low buns produce a more elegant and understated appearance.
Face-framing braids or baby hairs can also soften the hairstyle and add detail around the hairline. These elements help balance the structured bun with softer visual features.
Budget or Time Planning
Braided bun hairstyles are cost-effective because once braids are installed, forming a bun requires minimal additional tools. Basic materials such as hair ties and pins are typically sufficient.
Time planning depends mainly on the braiding process. Installing braids may take several hours depending on braid size and length. However, forming the bun itself usually takes only a few minutes.
Because braided buns require minimal daily styling, they are well suited for individuals with busy schedules.
Creative Expansion and Advanced Inspiration
Once basic braided bun techniques are mastered, more complex variations can be explored. Combining braids with twists or adding intricate scalp patterns can create more detailed designs. Braids can also be arranged into spiral or layered bun shapes to create artistic hairstyles.
Hair accessories provide additional opportunities for creativity. Metallic cuffs, decorative beads, and minimalist pins can highlight specific braid sections.
Experimenting with bun placement can also produce new visual effects. Side buns, stacked buns, and multi-layered buns introduce new variations while maintaining the protective nature of braids.
By combining different braid patterns, placements, and accessories, braided bun hairstyles can evolve into creative and expressive designs while still maintaining practicality and protective benefits.