10 Over 40 Haircuts For Women Thin Hair Ideas
Finding the ideal haircut after forty requires a thoughtful balance of volume enhancement, facial contouring, and manageable daily styling, especially when managing fine or thinning hair textures. As natural hormonal shifts, environmental factors, and aging alter hair density and individual strand thickness, traditional long or heavy blunt cuts can inadvertently pull hair downward, exposing scalp areas and creating a flat appearance. Readers exploring this structured guide will gain comprehensive knowledge regarding internal graduation, perimeter weight lines, crown elevation angles, and modern texturizing techniques across ten distinct haircut concepts. Understanding how shorter lengths, strategic soft layering, and deliberate parting lines interact enables women over forty to achieve fuller, thicker-looking hair while accentuating cheekbones and softening the jawline. This guide provides actionable step-by-step cutting methodologies, product preparation protocols, and styling advice to help you collaborate effectively with your stylist or execute home touch-ups with confidence. By adopting modern geometric precision and weight-relieving techniques, you can restore youthful lift, structural movement, and natural density to delicate thinning strands across every season of life.
Why This Idea Is Trending or Useful
Volumizing haircuts tailored for women over forty with fine or thinning hair continue to dominate modern Pinterest inspiration boards due to their practical value, stylish relevance, and empowering transformative results. Fine hair naturally lacks structural protein mass, causing it to collapse under excessive weight when grown past the shoulders. Modern mid-length and short cuts solve this challenge by removing heavy, dragging ends and redistributing weight to the highest points of the skull, delivering an instant optical lift. The strong DIY appeal and accessibility for beginners stem from the low-maintenance daily styling routines these cuts provide; textured crops and layered bobs require minimal blow-drying time and fewer heavy styling products to maintain all-day body. Furthermore, these designs embrace a modern minimalist style that celebrates natural texture rather than masking it under artificial stiffeners. By delivering an effortless, lightweight aesthetic that enhances natural bone structure, tailored fine-hair cuts provide a timeless, budget-friendly beauty solution that simplifies morning routines while boosting personal confidence.
Materials and Preparation
Achieving an impeccable volumizing haircut for thin hair begins with gathering professional-grade cutting and styling equipment, followed by systematic strand preparation to ensure optimal density and accurate sectioning. Essential cutting tools include Japanese stainless steel straight-edge shears, forty-tooth thinning texturizers, carbon sectioning combs with fine and wide teeth, non-slip crocodile sectioning clips, and a precision neck trimmer. For styling and daily maintenance, prepare a lightweight ceramic ionic blow dryer, a ceramic vented round brush, a root-lifting spray formulated with rice proteins, and a silicone-free volumizing mousse. Preparation begins with washing the hair using a gentle, sulfate-free thickening shampoo to eliminate sebum buildup without stripping natural lipids, followed by a weightless moisture conditioner applied exclusively to the mid-lengths and ends. Towel-dry the strands gently using a microfiber cloth to prevent friction-induced breakage, then mist a heat-activated plumping tonic evenly across the roots before mapping out clean horizontal and vertical sectioning quadrants across the scalp.
10 Over 40 Haircuts For Women Thin Hair Ideas
Idea 1: Classic Rounded Italian Bob with Internal Graduation
Step-by-Step Guide
The classic rounded Italian bob features a chin-to-lip grazing baseline with subtle interior graduation that pushes the outer hair outward into a soft, voluminous spherical silhouette. Unlike rigid angular bobs that leave fine ends looking sparse, the Italian bob incorporates curved interior weight lines that hug the jawline while generating continuous movement through the crown. The edges remain softly textured rather than bluntly chopped, giving the impression of dense, healthy hair that moves naturally with every step. This cut is exceptionally flattering for women over forty, as the curved perimeter softens square or angular jawlines while framing the neck with understated sophistication.
To create this haircut, section damp hair into four balanced quadrants, securing the top crown away from the occipital region. Begin at the nape by cutting a curved baseline that mirrors the natural contour of the neck, elevating each subsequent horizontal slice at a low forty-five-degree angle to build subtle internal graduation. As you transition to the side panels, over-direct the hair slightly backward to preserve fullness around the front cheekbones, keeping tension light to prevent strand stretching. Blend the top crown layers softly over the graduated base using point-cutting techniques to avoid harsh lines. Blow-dry with a medium round ceramic brush, rolling the ends under while lifting the root ninety degrees upward to lock in bouncy, rounded volume.
+-------------------------------------------------------------+
|               ROUNDED ITALIAN BOB ELEVATION                 |
+-------------------------------------------------------------+
|  [ Crown: 90-Degree Vertical Lift for Root Volume ]         |
|               |                                             |
|  [ Mid-Zone: 45-Degree Internal Graduation ]                |
|               |                                             |
|  [ Perimeter: Softly Curved Jawline Weight Line ]           |
+-------------------------------------------------------------+
 SAVE TO PINTEREST
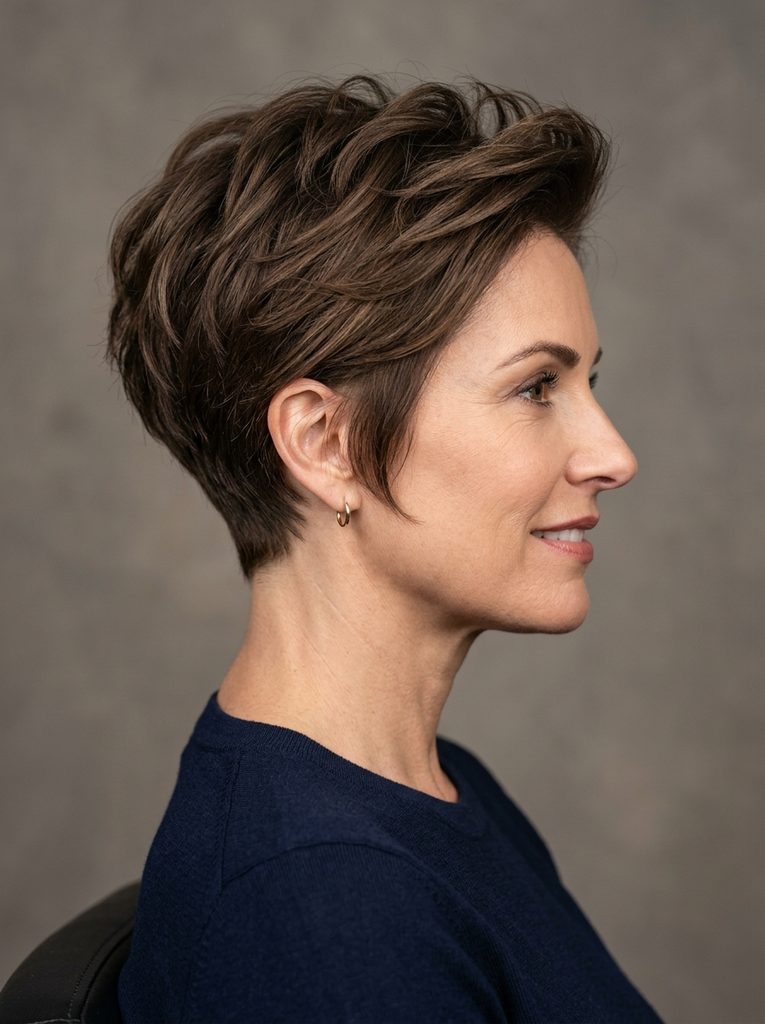
Idea 2: Textured Crown Pixie with Soft Tapered Nape
How to Create
The textured crown pixie cut utilizes a closely cropped nape and tapered temple panels paired with elongated, heavily point-cut layers across the top of the head. By condensing the perimeter hair close to the neck and ears, the longer crown layers stand out prominently, creating the optical illusion of exceptional density and vertical height. This vertical elevation draws visual focus upward toward the eyes and brow arch, effectively lifting the entire facial structure. It is a liberating, low-maintenance cut that eliminates the limp, stringy appearance often experienced when fine hair is kept long.
Start by isolating an oval crown section from the apex of the head to the parietal ridge, securing the top hair firmly with a clip. Using a scissor-over-comb technique, taper the lower nape and sideburn areas neatly against the scalp, creating a clean, graduated perimeter that flatters the curve of the neck. Release the upper crown panel, comb vertical sub-sections straight upward at a ninety-degree angle, and point-cut deeply into the ends to produce jagged, multi-length pieces that easily support one another. To style, apply a dime-sized amount of lightweight volumizing foam to damp roots, rough-dry using your fingers to direct hair forward and upward, and finish by pinching a pea-sized dab of matte texturizing paste through the crown tips to define individual layers.
 SAVE TO PINTEREST
Idea 3: Collarbone Clavicle Lob with Whispering Surface Layers
Execution Process
The collarbone clavicle lob represents an ideal compromise for women who desire the elegance of medium length without sacrificing the density required for thinning hair. Resting squarely atop the collarbone, this long bob preserves a solid, blunt-appearing perimeter baseline while integrating micro-fine surface layers that float over the top canopy. These whispering layers remove surface heaviness without gutting the perimeter thickness, preventing the bottom edge from appearing transparent or straggly. The resting length across the shoulders encourages natural strand flare, providing horizontal width that balances narrower facial profiles.
Establish a clean center or slightly off-center part on damp hair, combing the entire canopy flat down with zero elevation. Cut a crisp, horizontal blunt baseline straight across the collarbones, checking for symmetry by pulling the front focal points to the center of the chest. Once the perimeter is established, isolate thin vertical panels across the top canopy only, lifting them straight upward to seventy-five degrees and slide-cutting lightly down the outer three inches of the strands. This technique introduces airiness without disturbing the perimeter foundation. Style by applying a root-lifting spray, blow-drying with a large paddle brush directed downward, and adding loose, alternating flat-iron bends through the mid-lengths to enhance dimensional body.
 SAVE TO PINTEREST
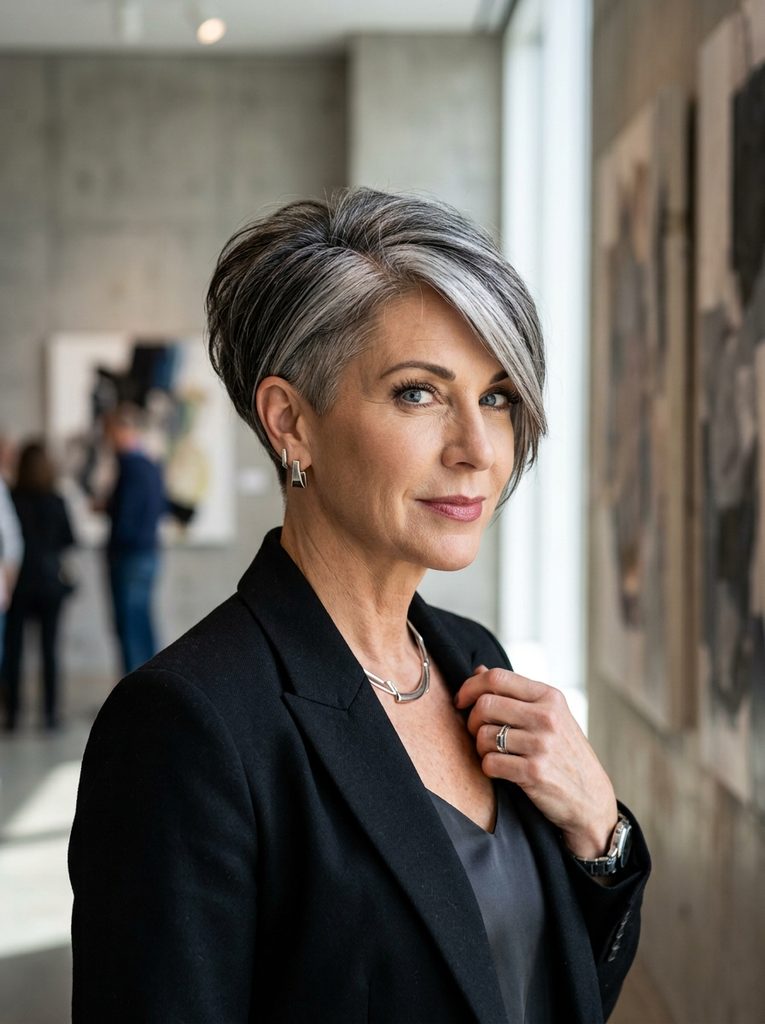
Idea 4: Asymmetrical Wedge Cut with Sweeping Side Fringe
Setup Method
The asymmetrical wedge cut combines vintage geometric structure with modern texturizing, featuring one side cropped close to the cheekbone while the opposite side cascades into a sweeping, dramatic diagonal fringe. The steep weight line of the wedge architecture stacks hair strands directly on top of each other, building tangible bulk through the occipital bone and crown. The deep side-swept fringe drapes diagonally across the forehead, concealing receding hairline areas around the temples while highlighting cheekbone structure. This bold, fashion-forward silhouette delivers an instant confidence boost, proving that short hair on mature women can feel both edgy and refined.
Begin by parting the hair along a deep side line aligned with the outer arch of the eyebrow, isolating the side with less volume. Cut the shorter side to a precise, tapered jawline guide using blunt shears, blending the cut seamlessly into a high-stacked wedge at the back of the head. On the heavier side, maintain an elongated diagonal cutting line extending from the crown forward toward the opposite jaw, preserving length through the front fringe. Use texturizing shears lightly on the interior bulk of the wedge to encourage stacked lift. To style, blow-dry the deep fringe across the forehead using a directional flat brush, applying a light mist of flexible-hold hairspray along the sweeping edge to hold the diagonal line in place all day.
 SAVE TO PINTEREST
Idea 5: French-Inspired Shaggy Crop with Wispy Bottleneck Bangs
Step-by-Step Guide
The French-inspired shaggy crop is an effortless, lived-in hairstyle that features shattered, overlapping tiers throughout the mid-lengths paired with airy bottleneck bangs. Bottleneck bangs open delicately at the center of the forehead before curving outward to graze the cheekbones, contouring the face while keeping the forehead from feeling overwhelmed by heavy hair. The shattered, tousled layers prevent fine hair from separating into rigid sections, creating an organic, piecey texture that disguises thinning patches near the crown. This cut radiates youthful artistic charm, offering a versatile wash-and-wear format that requires minimal thermal heat.
Isolate the bottleneck bangs at the front hairline by sectioning a small triangular zone, cutting the center to bridge-of-nose length before angling the shears downward toward the cheekbones on either side. Section the remaining hair into three horizontal tiers, over-directing each tier forward toward the face while razor-cutting the ends in short, feathery strokes to produce staggered lengths. Cut the back perimeter into a soft, broken line that rests just above the shoulders, avoiding blunt horizontal cuts. Apply a generous spritz of sea salt texturizing mist to damp hair, scrunch the strands upward with your palms, and allow the hair to air-dry naturally or use a bowl diffuser on low heat to lock in soft, effortless body.
 SAVE TO PINTEREST
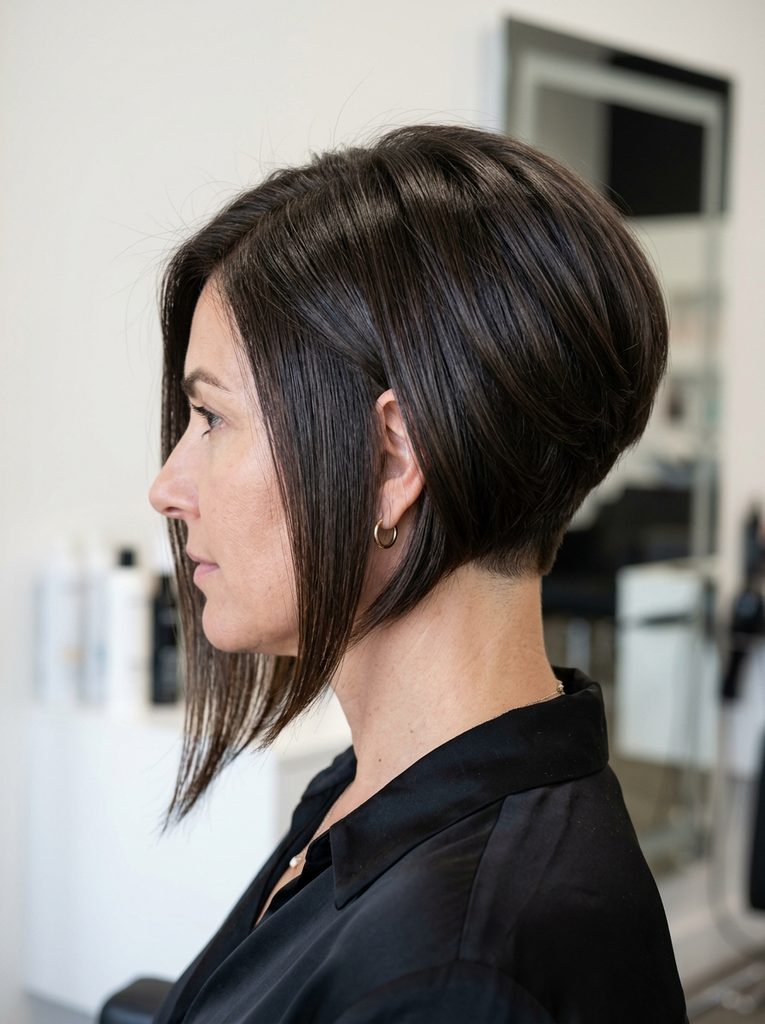
Idea 6: Beveled Inverted Bob with Hidden Undercut
How to Make
The beveled inverted bob with a hidden undercut is specifically engineered to maximize crown fullness for women with extremely fine, limp hair textures. By subtly shaving or closely clipping a small half-inch triangle at the base of the nape beneath the main hair canopy, the longer layers above are forced to bevel outward and upward over the shelf. The perimeter descends along a sleek forward angle from back to front, creating clean architectural lines that elongate the neck. The internal structure prevents the hair from falling flat against the nape, maintaining a plump, voluminous silhouette throughout the day.
Section away the entire upper canopy from ear to ear, isolating the lowest one inch of hair at the nape of the neck. Clip this lower nape section down to a uniform number two guard length with electric trimmers, creating a flat internal foundation shelf. Release the upper hair in thin horizontal slices, cutting each layer slightly longer than the preceding layer using downward finger angles to establish a smooth forward A-line slant. The natural tension allows the longer top layers to cup over the clipped shelf, creating an instant rounded bevel. Style by applying thermal smoothing serum, blow-drying with a medium round brush rolled under at the ends, and finishing with a shine spray for a sleek glass-like finish.
 SAVE TO PINTEREST
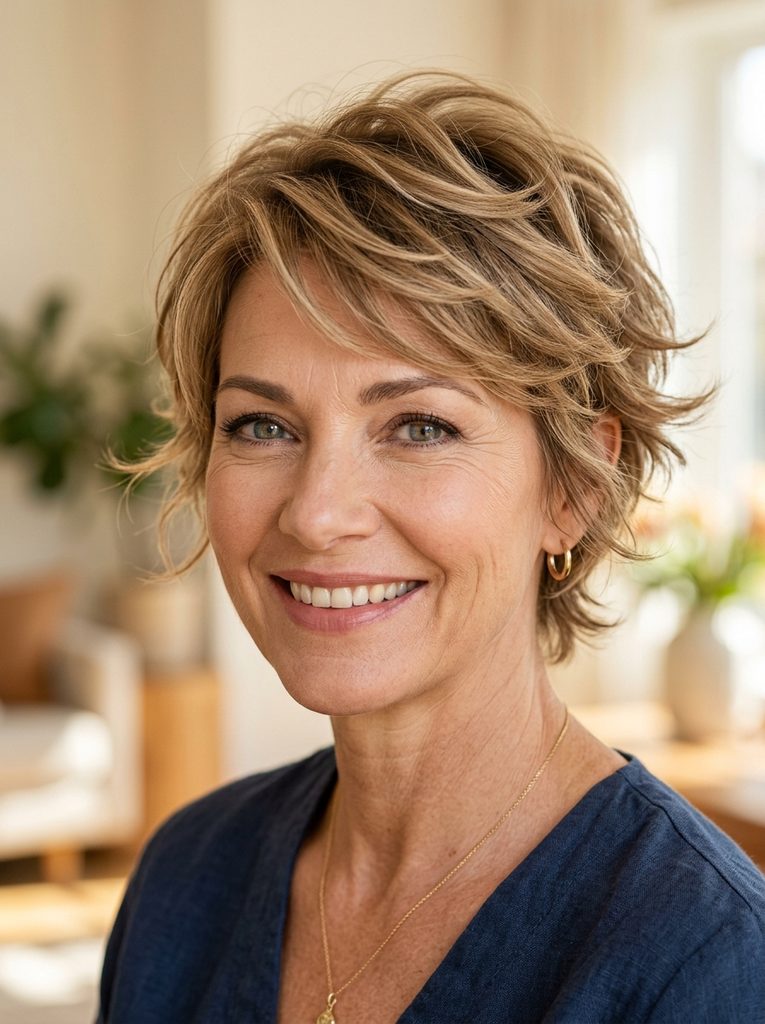
Idea 7: Feathered Layered Bixie with Temple-Framing Tendrils
Execution Process
The feathered layered bixie cut bridges the structural gap between a short bob and a pixie cut, providing the perimeter length of a cropped bob with the multi-directional layering of a pixie. This hybrid style features short, feathered layers through the top and sides that flick outward softly, creating horizontal visual expansion that makes fine hair appear substantially thicker. Delicate, wispy tendrils remain elongated in front of the ears and along the neckline, preserving a soft feminine contour around the jaw and neck. This design works exceptionally well for mature women transitioning away from long hair who still desire face-framing softness.
Isolate the crown section in a circular halo parting, securing the top hair with a clip. Cut the perimeter baseline to graze the mid-neck, using point-cutting techniques to create a soft, feathery edge rather than a blunt horizontal line. Release the crown and side panels, elevating vertical sub-sections straight out from the head at ninety degrees, using texturizing shears to create soft, overlapping feather steps that taper toward the tips. Leave two slender, elongated strands in front of the ears to serve as delicate temple frames. Style by applying volumizing mousse to damp roots, blow-drying with a small round brush rolled backward to flick the feathered ends, and setting with a lightweight finishing mist.
 SAVE TO PINTEREST
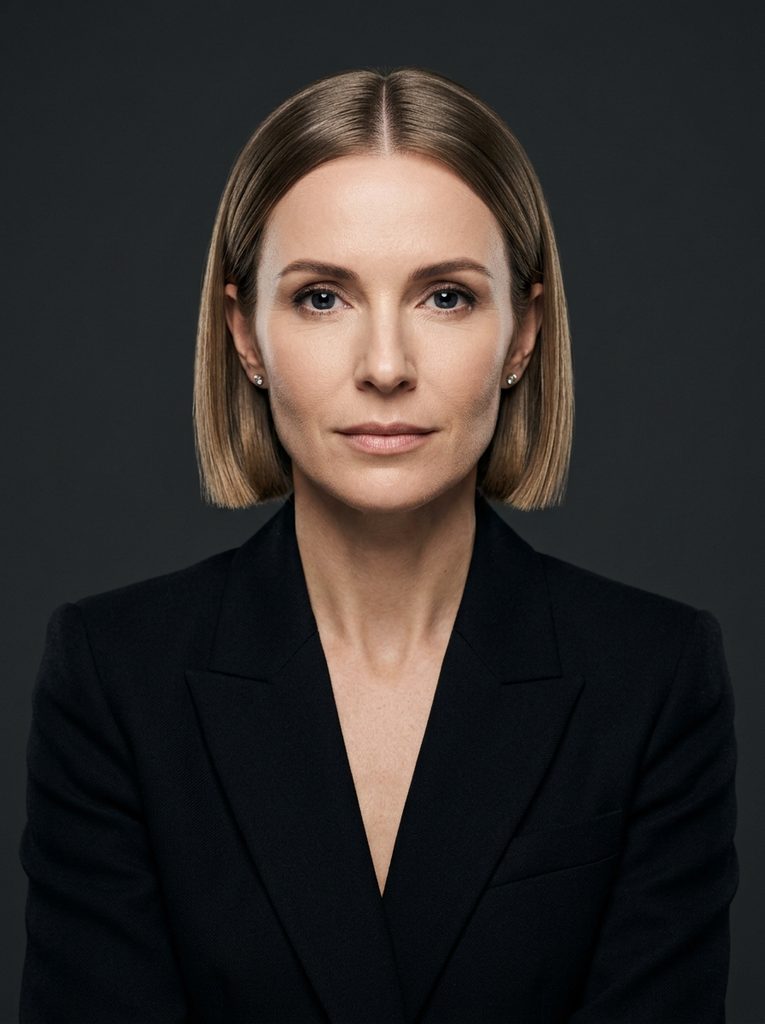
Idea 8: Soft Blunt Micro-Bob with Architectural Center Part
Setup Method
The soft blunt micro-bob sits precisely at the lip or jaw level, featuring an ultra-clean, one-length horizontal perimeter that creates the ultimate optical illusion of strand density. By elevating the baseline well above the shoulders, all available hair mass is concentrated into a dense, solid band, completely eliminating the transparency common with fine hair at longer lengths. Paired with an architectural center part, this minimalist cut creates crisp symmetrical lines that highlight cheekbones and frame the jawline with striking contemporary elegance. It delivers a modern, high-fashion aesthetic that feels intentional, bold, and remarkably youthful.
Begin by parting completely dry, pre-straightened hair down the exact geometric center from forehead to nape, securing the sides with clips. Position the client’s head tilted slightly forward, combing the back hair flat against the neck under zero elevation and zero tension. Hold your cutting shears horizontally and cut a razor-sharp baseline resting directly at the jawline, working symmetrically from the center outward to both sides. Drop the side quadrants down, aligning them precisely with the back guide without elevating the hair away from the face. Finish by running a flat iron down the lengths, beveling the ends inward by a fraction of an inch to prevent outward flipping, and smoothing flyaways with two drops of lightweight argan oil.
 SAVE TO PINTEREST
Idea 9: Voluminous Stacked Pixie-Bob with Side-Swept Volume
Step-by-Step Guide
The voluminous stacked pixie-bob features tight, graduated stacking up the back of the head that transitions into longer, fluid layers around the front and crown. The graduated stacked layers in the rear act as a physical wedge, physically pushing the upper crown layers upward to deliver maximum height and root lift without requiring backcombing. The front layers remain long enough to sweep diagonally across the forehead or tuck behind one ear, offering styling versatility and softening mature facial contours. This style is particularly effective for disguising crown thinning and adding dimensional fullness from every viewing angle.
Isolate the front hairline and crown, securing the hair with clips to focus on the lower occipital region. Take thin diagonal-forward slices across the nape, holding the hair at a steep forty-five-degree elevation and cutting with shears held parallel to the parting to build dense, graduated stacking. Continue this stacking technique upward until reaching the occipital bone, gradually decreasing elevation as you blend into the longer crown canopy. Cut the side panels along a forward diagonal angle that connects seamlessly with the stacked back. To style, apply root-boosting spray to damp crown hair, blow-dry using a small round boar-bristle brush lifted vertically, and finish with a dusting of volumizing texturizing powder at the roots for all-day structural hold.
 SAVE TO PINTEREST
Idea 10: Dynamic Shag-Lob with Curtain Fringe and Shattered Ends
How to Make
The dynamic shag-lob merges the shoulder-grazing length of a long bob with the rebellious, multi-tiered texturing of a classic 1970s shag, updated with soft curtain bangs. The curtain fringe parts gently at the center, cascading down to frame the cheekbones, which draws visual focus horizontally and broadens narrow facial features. The interior and perimeter ends are deeply point-cut and shattered, creating thousands of microscopic contact points between strands that prevent hair from clumping together and exposing the scalp. This style delivers an energetic, lived-in aesthetic that embraces natural wave movement and makes fine hair feel light and full of life.
Isolate the curtain bangs by parting a balanced triangle at the front hairline, cutting the center to lip length before sliding the shears downward toward the jawline in a smooth diagonal stroke. Section the remaining hair into vertical panels around the head, elevating each panel to ninety degrees from the head shape and using a guarded razor to remove weight from the mid-lengths to the ends in short sweeping motions. Keep the perimeter baseline resting at the clavicle, point-cutting the bottom edge to maintain a soft, non-uniform finish. Apply a quarter-sized dollop of curl-enhancing foam to damp hair, twist random one-inch sections around your fingers, and diffuse on low heat to encourage natural, tousled waves with exceptional texture.
 SAVE TO PINTEREST
Common Beginner Mistakes and How to Avoid Them
When executing or styling haircuts for women over forty with thin hair, several recurring technical mistakes can compromise the intended volume, thickness, and youthful appearance of the style. One frequent error is over-thinning or heavily razor-texturizing fine hair, which removes essential structural mass and leaves the ends looking shredded, frizzy, and transparent. To avoid this issue, always use texturizing shears with high tooth counts—such as forty teeth—and limit texturizing exclusively to the interior mid-lengths while preserving a solid, blunt-appearing perimeter baseline. Another common mistake is applying heavy, oil-based styling waxes, thick pomades, or silicone-laden serums to fine roots, which weighs down the hair and causes it to separate into greasy strands that expose the scalp. Always select weightless, water-soluble styling products like liquid root mists, styling foams, and dry texturizing sprays applied sparingly. Beginners also frequently neglect the natural shrinkage and cowlicks around mature hairlines; always cut delicate perimeter areas under minimal tension to ensure lines remain balanced once the hair dries naturally.
Practical Tips for Better Results
Achieving professional, salon-quality fullness with thin hair relies on disciplined prep work, smart blow-drying habits, and strategic product application. Always blow-dry fine hair in the opposite direction of its natural growth pattern during the initial rough-dry stage; lifting the roots against their natural fall locks in mechanical volume before styling with a round brush. Incorporating ceramic or tourmaline vented round brushes distributes heat evenly without snagging delicate thinning strands, smoothing the cuticle while building round internal curvature. When applying root-boosting sprays, hold the nozzle six inches away from the scalp and lift individual sections with a comb to ensure the product coats the root base rather than the mid-lengths. At night, protect fragile fine hair from friction-induced breakage and flattening by sleeping on a smooth silk or satin pillowcase. Additionally, schedule maintenance dusting trims every six to eight weeks to remove split ends before they travel up the hair shaft, preserving a crisp, dense perimeter baseline that keeps the haircut looking fresh and full.
+--------------------------------------------------------------------+
|                  FINE HAIR VOLUME & CARE PROTOCOL                  |
+--------------------------------------------------------------------+
|  Morning: Spritz root-lifter -> Blow-dry roots against natural fall |
|  Styling: Use 40-tooth texturizing shears only on internal zones   |
|  Finishing: Apply dry texturizing powder directly to crown roots   |
|  Every 6-8 Weeks: Dust perimeter ends to maintain baseline density |
+--------------------------------------------------------------------+
Styling, Presentation, or Organization Ideas
Styling and presenting fine-hair haircuts allows for diverse personal expression, ranging from polished, structured professional looks to playful, tousled weekend aesthetics. For everyday office wear, create an off-center part and use a ceramic flat iron to bevel the ends softly inward, producing a sleek, uniform contour that complements business attire while reflecting natural light. For weekend outings, apply a light dusting of volumizing powder directly to the crown roots, gently massaging with your fingertips to create an airy, textured crown with effortless volume. Incorporating subtle hair accessories—such as minimalist tortoiseshell barrettes or slim metallic hairpins placed along an off-center part—adds sophisticated detail while securing face-framing layers without causing tension damage. Organizing your vanity area with dedicated acrylic organizers for your lightweight styling foams, carbon tail combs, ceramic brushes, and thermal sprays ensures every tool is within easy reach for streamlined, five-minute morning styling routines.
Budget or Time Planning
Adopting and maintaining a tailored haircut for thin hair is an economical, time-efficient beauty choice that significantly streamlines daily routines while keeping salon expenses predictable. The initial salon consultation and transformation cut—including precision sectioning, perimeter cutting, customized internal weight removal, and volumizing styling—typically takes between forty-five to sixty minutes with an experienced stylist. Once the foundational structure is established, daily morning styling takes only ten to fifteen minutes, requiring just a quick directional blow-dry and minimal product application on dry strands. Financially, maintaining the density and sharpness of these styles requires a maintenance trim every six to eight weeks, which fits easily into regular personal care budgets. Investing forty to seventy dollars upfront in high-grade thickening shampoos, a quality root-boosting tonic, and a ceramic vented round brush will easily provide six months of salon-grade styling at home, eliminating the need for costly weekly salon blowouts.
Creative Expansion and Advanced Inspiration
Once you have established your ideal haircut structure, several creative expansions and customized color pairings can elevate the visual density of your hair even further. Strategically placed multidimensional color techniques—such as soft balayage babylights, shadow roots, or subtle lowlights—create optical depth that makes fine hair appear significantly thicker than uniform single-process color. Advanced stylists can experiment with seasonal adaptations, such as transitioning a collarbone lob into a chic micro-bob for summer months or allowing a textured pixie to grow into a layered bixie during cooler seasons. Incorporating gentle, heat-free styling methods—such as overnight satin heatless curling ribbons—produces bouncy, voluminous waves without subjecting fragile mature strands to thermal stress. As hair texture and density continue to evolve over time, maintaining open communication with your stylist allows you to adjust internal graduation angles and fringe lengths incrementally, ensuring your haircut consistently complements your changing features with modern elegance.