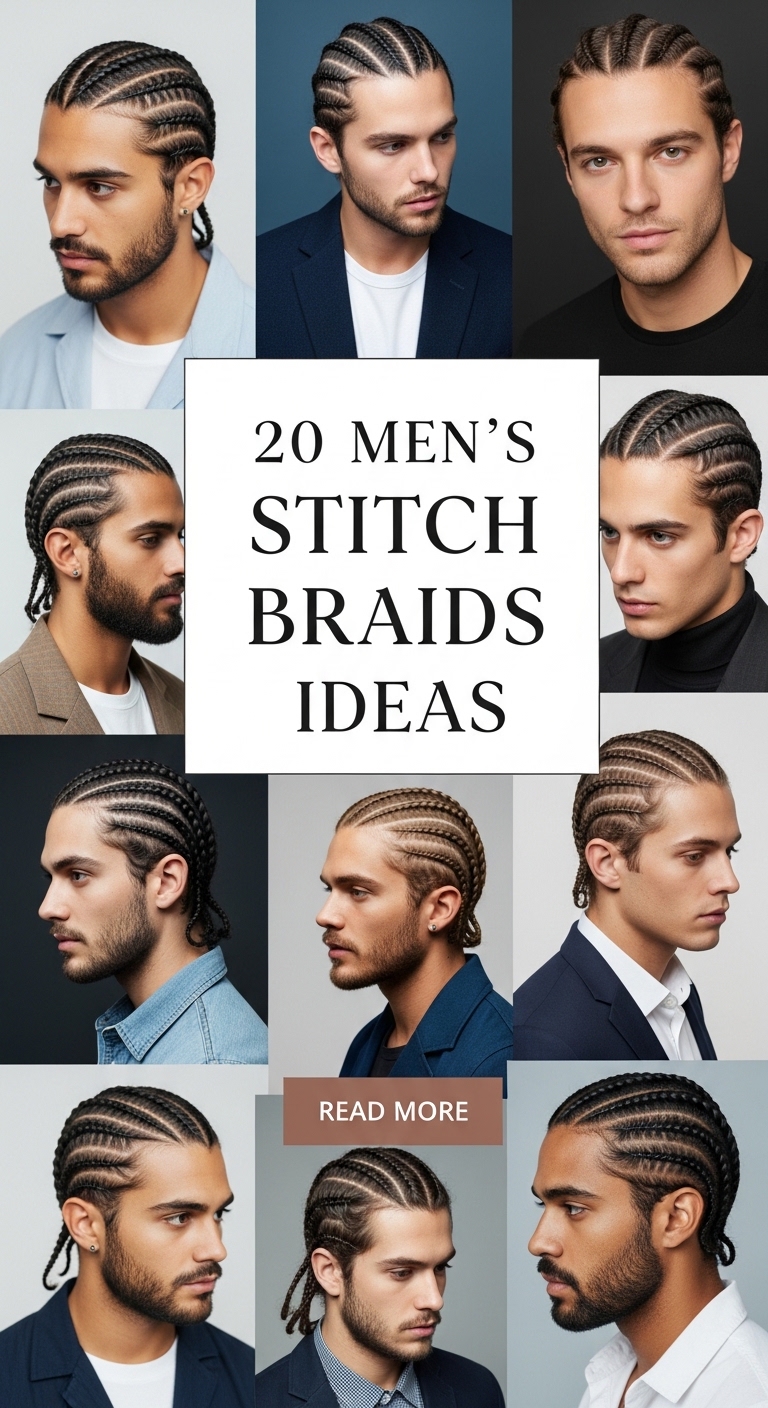
20 men’s stitch braids ideas
Men’s stitch braids have become one of the most requested braided styles in modern barbershops—and for good reason. Clean, defined, and visually striking, stitch braids are a refined evolution of traditional cornrows. What makes them different is the signature “stitched” effect: precise horizontal parting lines created with gel and a rat-tail comb before braiding. These clean, separated sections give the hairstyle a sharp, geometric look that instantly elevates any braid pattern.

Over the last few years, men’s grooming trends have shifted toward detail and structure. Fades are sharper. Lineups are cleaner. Texture is more intentional. Stitch braids fit perfectly into this modern aesthetic. They combine precision with cultural style, creating a look that feels both timeless and current. Whether paired with a taper fade, mid fade, burst fade, undercut, or even natural sides, stitch braids enhance facial structure and add bold personality.
Another major reason stitch braids are trending on Pinterest and social media is versatility. They work on short, medium, and long hair. You can keep them simple with four straight-back braids or go creative with zigzag patterns, criss-cross designs, side-swept angles, buns, ponytails, or extension length. They can be sporty, professional, edgy, or minimal depending on how they’re styled.
Beyond aesthetics, stitch braids are also a practical protective style. They reduce daily manipulation, help retain length, and keep natural hair organized. With proper maintenance—scalp oiling, nighttime durag protection, and light mousse refresh—they can stay neat for 1–3 weeks. For men growing their hair out, stitch braids are especially useful because they keep hair controlled during awkward growth phases.
The key to great stitch braids is preparation and precision. Hair must be clean, stretched, and moisturized. Strong-hold braiding gel is essential for creating crisp stitch lines. Even sectioning and consistent tension are what separate an average braid style from a Pinterest-worthy one.
In this guide, you’ll discover 10 detailed men’s stitch braid ideas in Part 1. Each idea includes a clear definition, step-by-step instructions, and a materials list to help you achieve a clean, professional result. These styles are beginner-friendly yet detailed enough to inspire your next barbershop visit.
Let’s dive into the first 10 men’s stitch braid ideas.
1. Classic 6 Straight-Back Stitch Braids

Introduction
The classic 6 straight-back stitch braids are the foundation of modern men’s braided styles. This look features six evenly spaced cornrows braided directly from the forehead to the nape, each separated by clean, defined stitch part lines. It’s symmetrical, masculine, and sharp—making it one of the most popular stitch braid styles on Pinterest.
This style works best for short to medium-length hair and pairs perfectly with a low taper or mid fade. It’s clean enough for professional settings but stylish enough to stand out casually. If you’re new to stitch braids, this is the perfect starting point because it highlights the stitch technique clearly without complex patterns.
What This Style Is
- Six evenly spaced straight-back cornrows
- Defined horizontal stitch lines within each braid
- Optional taper fade or sharp lineup
Step-by-Step How-To
- Start with freshly washed and blow-dried hair.
- Apply strong-hold braiding gel evenly.
- Use a rat-tail comb to divide hair into six equal vertical sections.
- Create small horizontal stitch lines using gel and comb pressure.
- Begin cornrowing tightly and evenly toward the back.
- Repeat for each section.
- Apply mousse and tie down with a durag for 20 minutes.
Materials Needed
- Rat-tail comb
- Strong-hold braiding gel
- Mousse
- Hair oil
- Durag
2. 4 Large Bold Stitch Braids
Introduction
Four large stitch braids offer a bold, clean, and low-maintenance look. With fewer braids, each section appears thicker and more dramatic. The stitch lines are wider and more noticeable, creating a powerful structured effect.

This style is perfect for men who prefer simplicity with impact. Installation is quicker compared to smaller braids, and maintenance is easier. It pairs especially well with a clean low taper fade.
What This Style Is
- Four thick straight-back stitch braids
- Wide stitch sections
- Clean lineup or taper fade
Step-by-Step How-To
- Section hair into four even vertical parts.
- Apply gel generously for smooth control.
- Create defined stitch segments horizontally.
- Cornrow straight back using steady tension.
- Set with mousse and tie down.
Materials Needed
- Rat-tail comb
- Braiding gel
- Edge brush
- Mousse
- Durag
3. 8 Thin Detailed Stitch Braids
Introduction

Eight thin stitch braids create a more intricate, detailed appearance. The additional sections allow for tighter stitch definition and a sleeker look. This style is ideal for men who prefer precision and sharp lines.
Although installation takes longer, the finished result is extremely clean and long-lasting. It pairs well with mid fades and sharp edge-ups.
What This Style Is
- Eight narrow straight-back braids
- Tight stitch detailing
- Crisp fade or natural sides
Step-by-Step How-To
- Divide hair into eight equal sections.
- Apply gel thoroughly to each section.
- Create small, consistent stitch lines.
- Cornrow tightly to the back.
- Finish with mousse and scalp oil.
Materials Needed
- Rat-tail comb
- Strong-hold gel
- Hair oil
- Mousse
- Durag
4. Stitch Braids with Low Taper Fade
Introduction

Pairing stitch braids with a low taper fade creates a clean, wearable style perfect for everyday life. The taper subtly blends the sideburns and neckline while keeping volume on top.
This combination enhances facial structure and keeps the braids as the focal point.
What This Style Is
- Straight-back stitch braids
- Low taper fade around perimeter
- Sharp lineup
Step-by-Step How-To
- Install straight-back stitch braids.
- Leave perimeter hair for taper blending.
- Visit barber for low taper fade.
- Maintain with light oil and durag.
Materials Needed
- Braiding gel
- Rat-tail comb
- Clippers (barber)
- Mousse
5. Side-Swept Stitch Braids
Introduction
Side-swept stitch braids angle diagonally instead of going straight back. This creates movement and asymmetry while maintaining clean stitch detailing.
It’s modern, stylish, and slightly edgy.
What This Style Is
- Diagonal cornrow pattern
- Clean stitch segments
- Sharp edge-up
Step-by-Step How-To
- Section hair diagonally across scalp.
- Apply gel to smooth each section.
- Create stitch lines horizontally.
- Cornrow following angled direction.
- Set with mousse.
Materials Needed
- Rat-tail comb
- Braiding gel
- Mousse
- Durag
6. Zigzag Stitch Braids

Introduction
Zigzag stitch braids add creative flair to the traditional style. Instead of straight parting, the scalp pattern follows a zigzag motion, while still incorporating stitch detailing.
This style is eye-catching and perfect for making a bold statement.
What This Style Is
- Zigzag part pattern
- Defined stitch segments
- Clean lineup finish
Step-by-Step How-To
- Map zigzag pattern carefully.
- Apply gel for hold.
- Create stitch lines within zigzag sections.
- Cornrow precisely.
- Tie down with durag.
Materials Needed
- Rat-tail comb
- Strong gel
- Section clips
- Mousse
7. Stitch Braids into a Bun

Introduction
Stitch braids styled into a bun offer both structure and versatility. Braids are directed toward the crown and secured into a top knot.
This style is practical for workouts while maintaining style.
What This Style Is
- Stitch braids braided toward crown
- Secured into bun
- Clean edges
Step-by-Step How-To
- Install stitch braids angled toward crown.
- Gather into bun using elastic band.
- Wrap braid around base to hide band.
- Smooth edges with gel.
Materials Needed
- Elastic band
- Gel
- Edge brush
- Durag
8. Criss-Cross Stitch Braids
Introduction
Criss-cross stitch braids create intersecting braid patterns for a highly detailed look. The stitched lines add extra precision to the overlapping sections.
This style stands out on social media and in person.
What This Style Is
- Intersecting cornrow pattern
- Clean stitch detail
- Sharp lineup
Step-by-Step How-To
- Map intersecting part lines.
- Secure sections with clips.
- Apply gel and create stitch segments.
- Cornrow carefully to maintain symmetry.
Materials Needed
- Rat-tail comb
- Braiding gel
- Section clips
- Mousse
9. Long Stitch Braids with Extensions
Introduction
Adding extensions to stitch braids creates dramatic length and thickness. This is ideal for men growing their hair or wanting a bold transformation.
The stitch detailing remains crisp while the added length enhances presence.
What This Style Is
- Feed-in stitch braids
- Added braiding hair
- Long straight-back finish

Step-by-Step How-To
- Begin braiding natural hair.
- Gradually feed in extensions.
- Maintain stitch line definition.
- Seal ends neatly.
Materials Needed
- Braiding hair
- Strong gel
- Rat-tail comb
- Mousse
10. Small Precision Stitch Braids
Introduction
Small precision stitch braids maximize detail and sharpness. The thin braids allow for numerous stitch segments, creating a highly refined aesthetic.
This style is perfect for those who love intricate designs and longer-lasting results.

What This Style Is
- Thin straight-back stitch braids
- Multiple tight stitch lines
- Optional fade or natural sides
Step-by-Step How-To
- Create multiple small sections evenly.
- Apply gel thoroughly.
- Form tight stitch segments with comb.
- Cornrow evenly to back.
- Set with mousse and durag.
Materials Needed
- Rat-tail comb
- Strong-hold gel
- Mousse
- Hair oil
- Durag
11. Stitch Braids with Mid Fade

Introduction
Stitch braids paired with a mid fade create one of the cleanest and most balanced modern men’s hairstyles. The mid fade removes bulk around the temples and sides while keeping enough contrast to highlight the braids on top. The stitched segments become even more visible because the fade draws attention upward to the defined scalp work. This style is extremely popular in barbershops because it blends braiding precision with contemporary grooming.
This look works especially well for men who want something bold but still polished. It’s sharp enough for social settings yet structured enough for professional environments. The mid fade enhances facial structure and keeps the style looking fresh longer between haircuts.
What This Style Is
- Straight-back or slightly curved stitch braids
- Clean mid fade around sides
- Sharp lineup and temple blend
Step-by-Step How-To
- Wash and stretch hair before braiding.
- Section hair evenly depending on desired braid count (6–8 works best).
- Apply strong-hold gel to create visible stitch lines.
- Cornrow each section tightly and consistently.
- Leave side perimeter clean for barber.
- Get a mid fade blended into the temples and neckline.
- Finish with mousse and tie down with a durag.
Materials Needed
- Rat-tail comb
- Strong-hold braiding gel
- Hair mousse
- Clippers (barber)
- Hair oil
- Durag
12. Curved Stitch Braids

Introduction
Curved stitch braids add movement and dimension to the classic straight-back style. Instead of braiding directly backward, the braids gently curve toward the crown or side, creating a flowing design across the scalp. The stitched lines follow the curve, giving the hairstyle a dynamic and artistic feel.
This style is perfect for men who want something slightly different but not overly complicated. It photographs beautifully and gives a custom look without being too bold.
What This Style Is
- Cornrows that curve naturally
- Horizontal stitch segments along curved path
- Clean edges for definition
Step-by-Step How-To
- Map out curved part lines using a rat-tail comb.
- Apply gel generously to each section.
- Create stitch segments following the curve.
- Braid carefully while maintaining shape consistency.
- Set with mousse and allow to dry under durag.
Materials Needed
- Rat-tail comb
- Braiding gel
- Section clips
- Mousse
- Hair oil
13. Stitch Braids with Design Part
Introduction
Adding a shaved design part to stitch braids enhances personality and edge. A single razor line or curved design near the temple or fade area adds contrast without overpowering the braids.
This is a subtle yet powerful upgrade that makes the style stand out. It’s popular among younger men and athletes who enjoy stylish details.
What This Style Is

- Straight-back stitch braids
- Razor design line near taper or fade
- Sharp edge-up
Step-by-Step How-To
- Install stitch braids as desired.
- Leave side area ready for fade or taper.
- Ask barber to add razor design line.
- Maintain with regular edge touch-ups.
Materials Needed
- Braiding gel
- Rat-tail comb
- Clippers (barber)
- Hair oil
- Durag
14. Feed-In Stitch Braids
Introduction
Feed-in stitch braids gradually add braiding hair to create thicker, longer braids. This technique makes the braid appear natural at the root while building volume toward the ends.

It’s ideal for men with shorter hair who want longer braids or fuller thickness. The stitched sections remain crisp while the added length provides dramatic impact.
What This Style Is
- Stitch braids with gradual extension feed-in
- Natural-to-thick braid transition
- Clean scalp definition
Step-by-Step How-To
- Start braiding natural hair at the root.
- Add small amounts of braiding hair gradually.
- Maintain stitch segments before each feed-in.
- Continue braiding to desired length.
- Seal ends if necessary.
Materials Needed
- Braiding hair extensions
- Strong gel
- Rat-tail comb
- Mousse
15. Half-Up Stitch Braids
Introduction
Half-up stitch braids combine structure with flexibility. The front braids remain neat and tight, while the back braids can hang freely or be tied into a small ponytail.
This style works well for men with medium-length hair and offers versatility for different occasions.
What This Style Is
- Stitch braids on top
- Back section tied up
- Clean edges

Step-by-Step How-To
- Install straight-back stitch braids.
- Section front and back halves.
- Secure back portion with elastic band.
- Smooth edges and apply oil.
Materials Needed
- Elastic band
- Gel
- Rat-tail comb
- Durag
16. Stitch Braids with Burst Fade
Introduction

A burst fade curves around the ear and blends into the neckline. When paired with stitch braids, it creates a rounded, modern silhouette. The curved fade contrasts beautifully with straight stitch lines.
This look is bold and highly trendy in contemporary barbershops.
What This Style Is
- Straight-back or angled stitch braids
- Rounded burst fade
- Sharp hairline
Step-by-Step How-To
- Install stitch braids evenly.
- Leave perimeter hair for fade shaping.
- Ask barber for burst fade around ear.
- Finish with edge-up and oil.
Materials Needed
- Braiding gel
- Rat-tail comb
- Clippers (barber)
- Mousse
- Hair oil
17. Side-Part Stitch Braids
Introduction

A defined side part changes the symmetry of stitch braids and adds a stylish edge. The braids follow the direction of the side part, creating asymmetry while maintaining stitch precision.
This style is clean yet slightly fashion-forward.
What This Style Is
- Defined side scalp part
- Stitch braids following side direction
- Sharp lineup
Step-by-Step How-To
- Create deep side part.
- Section braids following part direction.
- Apply gel and create stitch lines.
- Cornrow consistently.
- Set with mousse and durag.
Materials Needed
- Rat-tail comb
- Strong-hold gel
- Mousse
- Hair oil
18. Triangle Part Stitch Braids
Introduction

Triangle part stitch braids combine geometric base sections with stitched detailing. The triangle shapes create a unique scalp pattern before the braid even begins.
This style is creative yet structured, making it ideal for men who want something eye-catching.
What This Style Is
- Triangle-shaped base sections
- Stitch segments within each braid
- Clean edges
Step-by-Step How-To
- Section hair into triangle shapes.
- Apply gel to smooth sections.
- Create horizontal stitch segments.
- Braid evenly to the back.
- Finish with mousse.
Materials Needed
- Rat-tail comb
- Braiding gel
- Section clips
- Durag
19. Short Stitch Braids with Natural Sides
Introduction
Short stitch braids with natural sides keep the focus entirely on scalp detailing without fades. This is ideal for men who prefer minimal cutting.
The contrast between tight braids and natural sides gives a subtle textured look.
What This Style Is
- Short straight-back stitch braids
- Natural, un-faded sides
- Clean hairline

Step-by-Step How-To
- Section short hair carefully.
- Apply gel thoroughly.
- Create small stitch segments.
- Cornrow tightly.
- Maintain with oil and durag.
Materials Needed
- Strong-hold gel
- Rat-tail comb
- Mousse
- Hair oil
20. Extra-Detailed Micro Stitch Braids
Introduction
Micro stitch braids are ultra-thin braids with tightly spaced stitch segments. This style requires patience and precision but delivers a high-definition, luxury finish.
It’s one of the most detailed stitch braid styles and can last longer with proper care.

What This Style Is
- Very thin straight-back stitch braids
- Numerous precise stitch lines
- Sharp fade or natural sides
Step-by-Step How-To
- Divide hair into many small sections.
- Apply gel for strong hold.
- Create very small stitch segments.
- Cornrow evenly with consistent tension.
- Set with mousse and tie down overnight.
Materials Needed
- Rat-tail comb
- Strong-hold gel
- Mousse
- Hair oil
- Durag