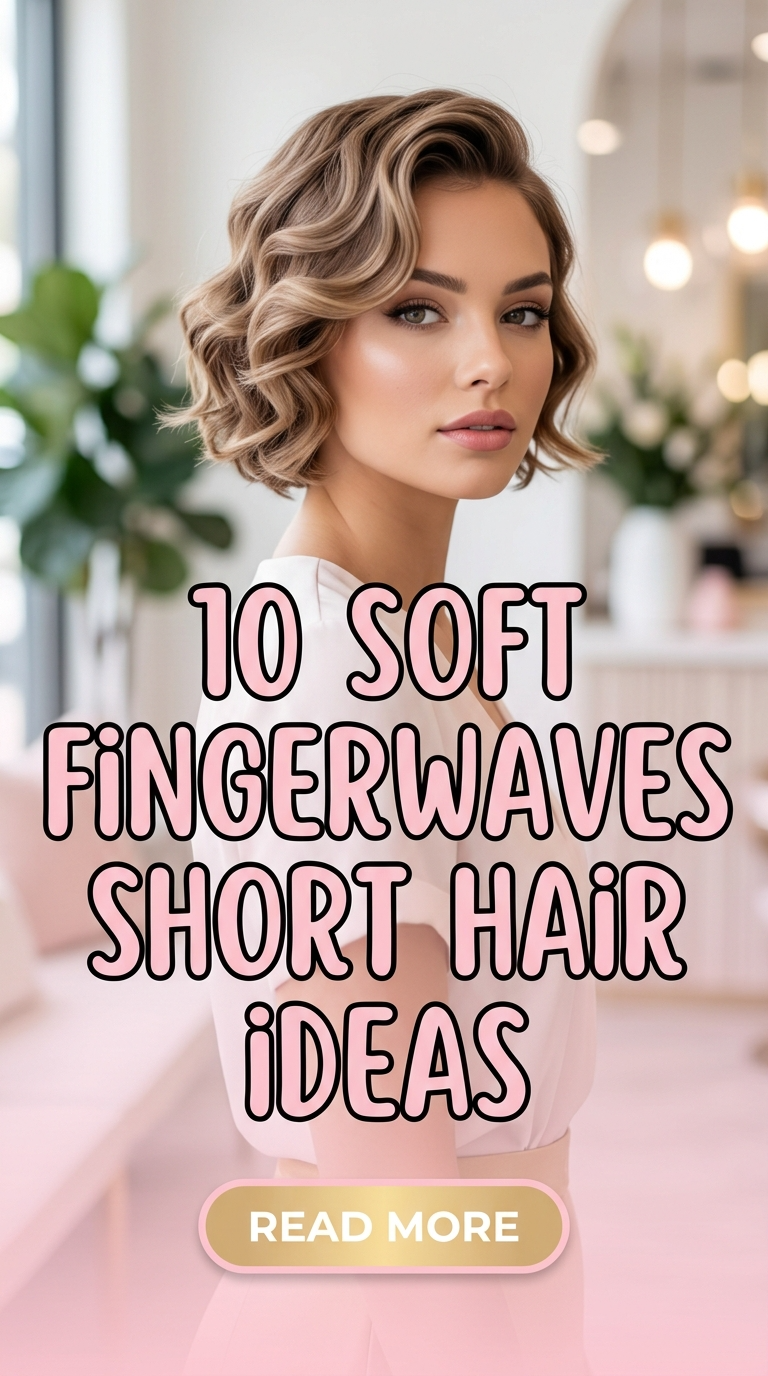

If you love vintage glamour with a modern twist, soft fingerwaves on short hair are one of the most elegant and timeless hairstyles you can choose. Originating in the 1920s and 1930s, finger waves have always symbolized sophistication, confidence, and polished beauty. But today’s version is softer, more wearable, and incredibly versatile — making it one of Pinterest’s most saved short hair styles.
Soft fingerwaves are perfect for short hair because they enhance shape, structure, and shine without requiring long length. Whether you have a pixie cut, bob, cropped cut, or tapered short style, finger waves add sculpted movement that instantly elevates your look.
What makes “soft” fingerwaves different from traditional tight waves is the finish. Instead of dramatic, stiff ridges, soft fingerwaves feature flowing S-shaped curves, subtle volume, and flexible hold. They look romantic rather than rigid. Glamorous rather than theatrical. And most importantly — wearable.
This hairstyle works beautifully for weddings, formal events, date nights, photoshoots, and even polished everyday styling. It flatters multiple face shapes and enhances cheekbones and jawlines effortlessly.
In this detailed Pinterest-style guide, you’ll discover 10 soft fingerwaves short hair ideas, each deeply explained with styling guidance, step-by-step instructions, and materials lists. Every look is beginner-friendly yet refined enough to look salon-quality.
If you’re ready to embrace vintage-inspired elegance with modern softness — let’s dive in.
1. Classic Soft Side-Part Fingerwaves
The classic soft side-part fingerwave is timeless. It combines a deep side part with sculpted waves that gently flow across the head. This version is softer than traditional 1920s waves, making it perfect for modern wear.

The deep side part adds drama and structure, while the waves soften facial features. This style works especially well on short bobs and pixie cuts. It highlights cheekbones and gives the illusion of fuller hair.
The beauty of this style lies in balance. It looks glamorous but not overdone. It’s structured but still touchable. Perfect for weddings, evening events, or formal gatherings.
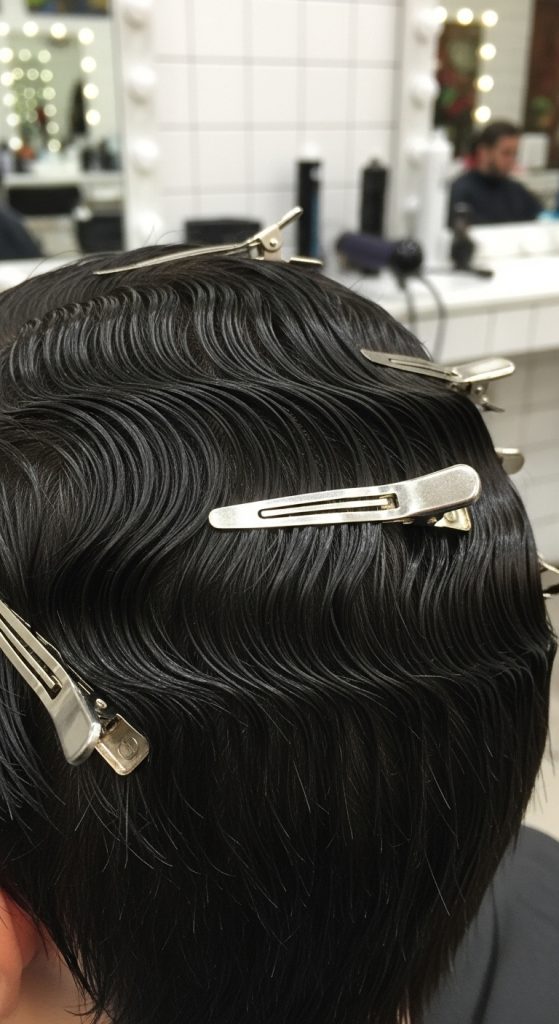
How To
Start with damp, freshly washed hair. Create a deep side part using a tail comb. Apply a strong-hold styling gel evenly throughout your hair.
Using a fine-tooth comb, begin shaping S-shaped waves by pressing the comb forward, then using your fingers to hold the ridge in place. Clip each ridge with wave clips.
Continue shaping waves across the head. Allow hair to air dry or sit under a hooded dryer. Once fully dry, gently remove clips and softly brush through for a relaxed finish.
Materials Used
- Tail comb
- Fine-tooth comb
- Strong-hold styling gel
- Wave clips
- Hooded dryer (optional)
- Light shine spray
2. Soft Fingerwaves with Pixie Cut
Fingerwaves look stunning on pixie cuts because they emphasize texture and shape. The short length allows waves to appear more defined and sculpted.
This style is ideal for those with tapered sides and slightly longer top layers. It creates dimension and enhances natural head shape beautifully.

Soft waves prevent the pixie from looking flat while maintaining elegance.
How To
Apply styling mousse to damp pixie-length hair. Comb through evenly.
Use a fine-tooth comb to create small, controlled S-shaped waves across the top section. Secure ridges with small clips.
Let dry naturally or diffuse lightly. Remove clips gently and use light hairspray for hold.
Avoid brushing too aggressively to maintain structure.
Materials Used
- Styling mousse
- Fine-tooth comb
- Wave clips
- Diffuser
- Light hairspray
3. Fingerwaves with Tucked-Behind-Ear Style

This modern variation features soft waves on one side while the other side is tucked behind the ear. It creates asymmetry and highlights facial features.
This style feels red-carpet ready and works beautifully with statement earrings.
How To
Create a side part. Apply gel to damp hair.
Shape waves on the larger section using comb technique. On the smaller side, comb hair smoothly and tuck behind ear.
Secure waves with clips and allow to dry completely.
Remove clips and apply shine serum lightly.
Materials Used
- Styling gel
- Fine comb
- Wave clips
- Shine serum
4. Soft Fingerwaves on Bob-Length Hair

For short bobs, soft fingerwaves create romantic elegance. The waves add structure without making hair stiff.
This style is perfect for chin-length or jaw-length bobs.
How To
Blow dry hair slightly damp. Apply medium-hold gel.
Section hair horizontally and create waves from roots downward.
Clip each ridge and let set completely before releasing.
Lightly brush to soften final look.
Materials Used
- Blow dryer
- Styling gel
- Comb
- Clips
5. Voluminous Fingerwaves
Adding volume at the crown makes fingerwaves look fuller and more modern.
Perfect for fine hair.
How To
Apply volumizing mousse at roots.
Blow dry slightly before shaping waves.

Focus waves at mid-lengths.
Use hairspray for lift.
Materials Used
- Volumizing mousse
- Blow dryer
- Wave clips
- Hairspray
6. Soft Fingerwaves with Glam Accessories
Adding jeweled clips or pearl pins enhances elegance.
Ideal for weddings.
How To
Create classic waves.

After drying, insert decorative hairpins at ridges.
Secure gently.
Materials Used
- Styling gel
- Comb
- Wave clips
- Decorative hairpins
7. Wet-Look Soft Fingerwaves

This variation keeps gel shine visible for modern editorial finish.
Great for photoshoots.
How To
Apply generous gel.
Shape waves without brushing out after drying.
Add gloss spray.
Materials Used
- Strong gel
- Comb
- Shine spray
8. Side-Swept Soft Fingerwaves
Side-swept waves create romantic softness.
Perfect for date nights.
How To
Create deep side part.
Direct waves toward one side.
Let dry fully.
Finish with flexible spray.
Materials Used
- Tail comb
- Gel
- Wave clips
- Hairspray
9. Fingerwaves with Short Tapered Cut
Tapered cuts allow waves only on top.

It creates dramatic contrast.
How To
Apply gel only to top section.
Shape waves carefully.
Keep sides smooth.
Materials Used
- Styling gel
- Fine comb
- Clips
10. Soft Fingerwaves with Subtle Curls at Ends
Adding loose curls at ends blends vintage with modern texture.
Ideal for playful look.

How To
Create fingerwaves at roots.
Use small curling iron at ends.
Blend gently with fingers.
Apply shine spray.
Materials Used
- Styling gel
- Fine comb
- Curling iron
- Shine spray
