Ballet bun hairstyles represent one of the most recognizable and structured hair arrangements in dance and performance styling. These hairstyles gather the hair tightly into a rounded bun positioned near the crown or slightly lower at the back of the head. The purpose of a ballet bun is both practical and aesthetic. It keeps hair securely away from the face while creating a clean, elegant silhouette that complements the graceful movements of ballet dancers. Because of this refined appearance, ballet buns have also become popular beyond dance studios. They now appear frequently in Pinterest ideas related to beauty inspiration, minimalist style, and formal hairstyles.
This article explores ten ballet bun hairstyle ideas that combine the traditional dance aesthetic with modern styling variations. Each idea explains how the bun structure works and how the hairstyle can be created using clear step by step methods. These styles range from classic tight ballet buns to softer variations with twists, braids, or subtle texture.
Ballet bun hairstyles are useful because they provide both organization and elegance. The style keeps hair controlled during physical activity while maintaining a polished appearance. With the right preparation and technique, these hairstyles can be recreated at home as an easy project. The ideas presented here offer creative inspiration while preserving the clean structure that defines ballet hair styling.
Why This Idea Is Trending or Useful
Ballet bun hairstyles remain popular across Pinterest inspiration boards because they combine simplicity with sophistication. The clean structure of the bun highlights facial features and creates a balanced hairstyle that works in both casual and formal environments. Unlike many complex hairstyles, a ballet bun relies on precise gathering and secure placement rather than elaborate decoration. This minimalist structure aligns well with modern design preferences that emphasize clean lines and organized aesthetics.
Another reason these hairstyles continue to trend is their practicality. Ballet buns keep hair securely in place for extended periods. This feature is especially useful during physical activities such as dance, exercise, or professional tasks where loose hair could become distracting. The bun also protects the hair from tangling by keeping it neatly gathered.
The DIY appeal of ballet bun hairstyles further contributes to their popularity. Many individuals can recreate the style with basic tools and simple step by step techniques. Hair ties, pins, and brushes are usually the only materials required. This accessibility makes ballet buns beginner friendly while still allowing room for creative variations such as braided or twisted designs.
The polished aesthetic of ballet buns also photographs well. The smooth shape and symmetrical structure create a visually pleasing hairstyle that often appears among trending ideas in beauty and fashion content.
Materials and Preparation
Preparing to create a ballet bun hairstyle requires organizing a few essential materials and ensuring that the hair is smooth and manageable. The most important preparation step is detangling the hair thoroughly. Smooth hair allows the bun to form evenly and helps maintain the sleek appearance associated with ballet styling. Washing and conditioning the hair beforehand can improve manageability and reduce frizz.
Common materials used for ballet bun hairstyles include hair ties, bobby pins, hairpins, and a smoothing brush. These tools help gather the hair securely and maintain the bun’s structure. Some individuals also use hair nets to cover the bun, which helps keep smaller strands in place and creates a polished finish.
A rat-tail comb can be useful for creating clean part lines or smoothing the hair toward the bun. Lightweight hair gel or styling cream may also be used to reduce flyaway strands and enhance the sleek appearance of the hairstyle.
Preparation also involves deciding the placement of the bun. Traditional ballet buns are positioned at the back of the head aligned with the ears. However, variations may place the bun slightly higher or lower depending on the desired look.
Once the hair is detangled and gathered into the chosen position, the bun can be formed by twisting or wrapping the hair and securing it with pins.
MAIN IDEAS
Idea 1: Classic Ballet Bun
How to Create

The classic ballet bun is the most traditional version of the hairstyle and is widely used by dancers during performances and practice sessions. This bun sits at the back of the head and forms a smooth, circular shape. The hair is gathered tightly so that no strands interfere with movement or visibility. The elegance of the classic ballet bun lies in its simplicity and symmetry. Every strand is carefully smoothed and secured so the bun appears balanced from every angle.
This hairstyle frequently appears in Pinterest ideas because it represents a timeless standard in dance and formal hair styling. The bun creates a graceful outline that complements the posture of the neck and shoulders. It also keeps the focus on facial expression and movement during performance.
The classic bun also works well outside the dance environment. It can be worn during professional events or formal gatherings because it creates a polished appearance. The structure of the bun emphasizes neatness and control while remaining visually elegant.
Step-by-Step Guide
Begin by brushing the hair thoroughly to remove tangles. Smooth the hair backward toward the center of the head aligned with the ears. Gather the hair into a ponytail and secure it tightly with a hair tie.
Twist the ponytail gently while maintaining even tension. Continue twisting until the hair forms a rope-like strand.
Wrap the twisted hair around the base of the ponytail to form a circular bun. Keep the wrapping motion close to the scalp so the bun remains compact.
Secure the bun with bobby pins placed evenly around the base. Adjust the bun slightly if needed so it appears symmetrical. Finish by smoothing loose strands with a small amount of styling product.
Idea 2: Sleek High Ballet Bun
How to Make

The sleek high ballet bun moves the traditional bun placement slightly upward toward the crown of the head. This placement creates a lifted appearance that highlights the neck and facial structure. High buns are often used in ballet variations where choreography benefits from a slightly elevated hairstyle.
Pinterest inspiration frequently features high ballet buns because they create a dramatic and refined silhouette. The higher placement emphasizes the vertical line of the dancer’s posture while maintaining the smooth structure associated with ballet hairstyles.
This bun style also works well for formal occasions. The elevated bun draws attention upward and creates a balanced visual shape.
Step-by-Step Guide
Brush the hair upward toward the crown of the head and gather it into a high ponytail.
Secure the ponytail tightly with a hair tie. Smooth the hair surface using a brush or comb.
Twist the ponytail and wrap it around the base of the ponytail to create the bun shape.
Idea 3: Braided Ballet Bun
How to Create

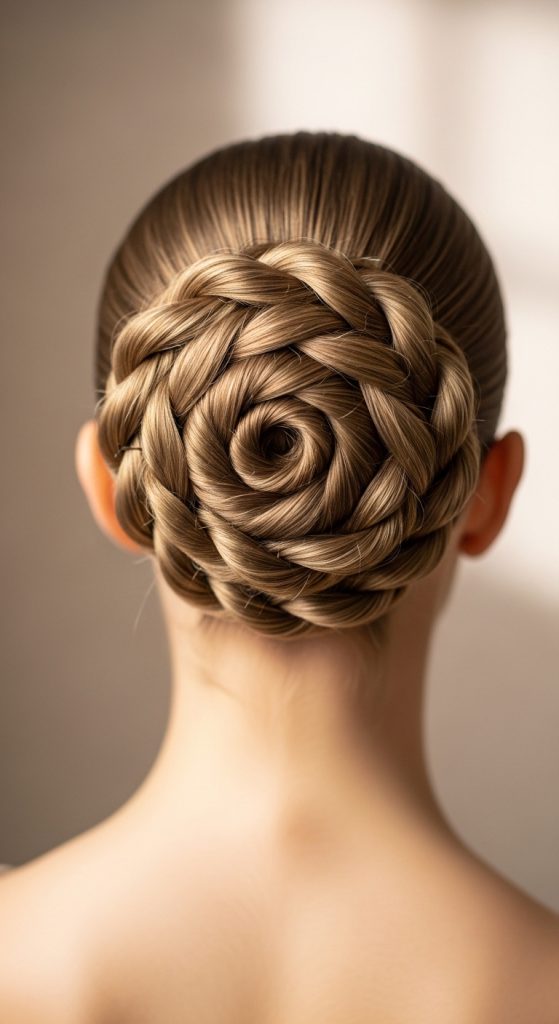
The braided ballet bun introduces an additional layer of texture to the traditional ballet hairstyle. Instead of wrapping a simple twisted ponytail into a bun, the hair is braided first and then shaped into the bun structure. This braid adds visible detail that enhances the overall aesthetic while still maintaining the disciplined appearance expected in ballet styling. The braided design is especially noticeable because each braid section creates a repeating pattern that wraps around the bun. This pattern adds depth and dimension without disrupting the clean silhouette of the hairstyle.
Braided ballet buns often appear in Pinterest ideas because they combine traditional dance styling with decorative texture. The braid reinforces the bun’s stability while also adding visual interest. This makes the hairstyle particularly useful for long rehearsals or stage performances where hair must remain secure for extended periods.
Another advantage of the braided bun is its adaptability. The braid can be tight and polished for a formal ballet performance or slightly softer for everyday styling. Regardless of the variation, the braided structure ensures the bun maintains its circular form.
Step-by-Step Guide
Begin by brushing the hair smoothly toward the back of the head. Gather the hair into a ponytail positioned at the center back of the head and secure it with a hair tie.
Divide the ponytail into three equal sections and create a standard braid. Continue braiding until the hair reaches the ends and secure it with a small elastic band.
Wrap the braid around the base of the ponytail in a circular motion to form the bun shape. Because the braid is thicker than twisted hair, the bun will appear more textured.
Secure the bun with several bobby pins inserted around the base. Adjust the braid slightly to maintain a balanced and symmetrical appearance.
Idea 4: Twisted Ballet Bun
Execution Process
The twisted ballet bun replaces the braid with two or more twisted sections of hair that are wrapped together to form the bun. This technique creates a spiral pattern that remains visible within the bun structure. Twisted buns are commonly used in ballet because they provide stability while maintaining the smooth aesthetic required for performance.
Pinterest inspiration boards often feature twisted buns because the twisting technique adds visual movement to the hairstyle. The twists create curved lines that spiral into the bun, making the hairstyle appear elegant without becoming overly decorative.
The twisted ballet bun also distributes the hair evenly around the bun’s base. This helps maintain a balanced shape and prevents uneven bulges within the hairstyle. The result is a bun that appears both structured and refined.
Step-by-Step Guide
Start by brushing the hair smoothly toward the back of the head. Gather it into a ponytail positioned slightly above the nape of the neck.
Divide the ponytail into two equal sections. Twist each section individually in the same direction so the strands remain tight and controlled.
Once both sections are twisted, wrap them around each other to form a rope-like structure. This step helps the twists hold their shape.
Wrap the twisted rope around the base of the ponytail to create the bun. Secure the bun with bobby pins placed around the edges.
Idea 5: Low Ballet Performance Bun

How to Make
The low ballet performance bun is positioned slightly lower than the traditional bun, resting closer to the nape of the neck. This placement creates a graceful line that complements the natural posture of the head and shoulders. The hairstyle remains smooth and compact so that it does not interfere with costume accessories or stage movement.
This bun variation appears frequently among Pinterest ideas because it emphasizes elegance while maintaining practicality. A lower bun also works well with hair accessories such as decorative combs or hairpieces often used in stage performances.
The lower placement creates a subtle and refined silhouette that highlights the dancer’s posture. The hairstyle maintains the disciplined structure associated with ballet styling while offering a slightly softer visual effect.
Step-by-Step Guide
Brush the hair downward toward the nape of the neck and gather it into a low ponytail.
Secure the ponytail with a hair tie, ensuring the hair remains smooth and evenly gathered.
Twist the ponytail and wrap it around the base to form a compact bun.
Secure the bun with bobby pins placed around the perimeter. Smooth any loose strands to maintain the clean appearance required for ballet styling.
Idea 6: Double Twist Ballet Bun
Setup Method
The double twist ballet bun uses two separate twisted sections that are wrapped together to form a layered bun structure. This technique creates a slightly fuller bun while maintaining the sleek appearance expected in ballet hairstyles.

This style often appears in Pinterest inspiration collections because the layered twists add subtle visual depth. The bun maintains the clean circular shape associated with ballet styling while incorporating additional texture through the twists.
Step-by-Step Guide
Divide the hair into two equal ponytails positioned closely together.
Twist each ponytail individually and wrap them around each other to form a bun.
Secure with multiple pins until the bun feels stable.
Idea 7: Ballet Bun with Hair Net
How to Create

A ballet bun secured with a hair net is commonly used in professional dance settings. The hair net helps keep small strands in place and maintains the bun’s smooth appearance during movement.
Step-by-Step Guide
Create a classic bun and place a hair net over it.
Secure the net with pins around the base of the bun.
Idea 8: Braided Crown Ballet Bun

How to Make
This style combines a braid along the hairline with a bun at the back.
Step-by-Step Guide
Create a braid around the crown and gather remaining hair into a bun.
Secure with pins.
Idea 9: Sleek Center-Part Ballet Bun

How to Create
This variation includes a precise center part before forming the bun.
Step-by-Step Guide
Part hair in the center, smooth both sides back, and create a bun.
Idea 10: Romantic Ballet Bun
How to Create
This bun softens the traditional ballet look by allowing subtle texture and soft strands around the face.
Step-by-Step Guide

Gather hair loosely into a bun and allow small sections to frame the face.
Common Beginner Mistakes and How to Avoid Them
One common mistake when creating ballet buns is gathering the hair unevenly. When the hair is pulled from different angles, the bun may appear off-center or irregular. Ensuring the hair is brushed evenly toward the bun position helps maintain symmetry. Another frequent issue involves insufficient pin placement. A ballet bun requires several pins positioned around the base to secure the structure. Using too few pins may cause the bun to loosen during movement.
Over-tightening the hair is another mistake. While ballet buns must remain secure, excessive tension can cause scalp discomfort. A balanced approach allows the hair to remain controlled without unnecessary strain.
Ignoring hair preparation can also affect the final result. Hair that is tangled or frizzy may create bumps within the bun structure. Brushing and smoothing the hair before styling helps maintain the sleek appearance required for ballet.
Selecting the wrong bun placement can also affect the hairstyle’s balance. The bun should align with the natural shape of the head to maintain proper posture and symmetry.
Practical Tips for Better Results
Achieving a polished ballet bun often depends on careful preparation and controlled styling techniques. One effective method involves smoothing the hair with a brush while gathering it into a ponytail. This ensures that all strands lie evenly against the scalp. Using sectioning clips during preparation can also help manage thick or long hair while forming the bun.
Pin placement is another key factor. Inserting pins in opposite directions helps anchor the bun securely. Alternating the direction of the pins prevents the bun from shifting throughout the day.
Using a small amount of styling gel or cream can help control flyaway strands. Applying the product sparingly ensures the hair remains smooth without appearing stiff.
Maintaining symmetry is also important. After forming the bun, checking the hairstyle from different angles helps confirm that the bun remains centered and evenly shaped.
Styling, Presentation, or Organization Ideas
Ballet buns can be styled in subtle ways while maintaining their traditional structure. Simple hair accessories such as small decorative pins or minimalist combs can enhance the bun without distracting from its clean shape. These accessories are often used in stage performances or formal events.
Face-framing strands may also be included for softer variations of the ballet bun. Allowing a few strands near the temples can create a relaxed aesthetic while preserving the overall bun structure.
Adjusting the bun’s volume is another styling option. Slightly loosening the bun after securing it can create a fuller appearance while still maintaining the circular shape.
Matching the bun placement to the occasion also improves presentation. High buns create a dramatic silhouette, while low buns provide a more elegant and understated look.
Budget or Time Planning
Ballet bun hairstyles are among the most practical hair arrangements because they require minimal tools and preparation. Most styles can be created using basic materials such as hair ties, brushes, and bobby pins. These items are inexpensive and widely available.
Time planning is also simple. A basic ballet bun can often be completed within a few minutes once the hair is properly prepared. More detailed variations such as braided buns may require additional time but remain manageable.
Regular hair care also contributes to successful styling. Maintaining healthy hair through conditioning and trimming helps ensure the bun appears smooth and balanced.
Because ballet buns remain secure once pinned, they require little maintenance throughout the day. This makes them ideal for long events, performances, or busy schedules.
Creative Expansion and Advanced Inspiration
Once the basic ballet bun technique is mastered, additional variations can be explored to create more intricate styles. Braided sections can be incorporated around the bun to produce decorative patterns. Twisted strands can also be layered to create spiral shapes within the bun.
Hair accessories offer another way to expand the design. Subtle decorative pins, ribbons, or minimalist combs can add unique visual elements while preserving the elegant structure of the bun.
Experimenting with bun placement also allows for creative expression. Side buns, for example, create asymmetrical shapes that offer a modern variation of the traditional ballet style.
Combining these techniques with thoughtful styling allows ballet buns to evolve from a simple dance hairstyle into a versatile and elegant hair design suitable for many occasions.