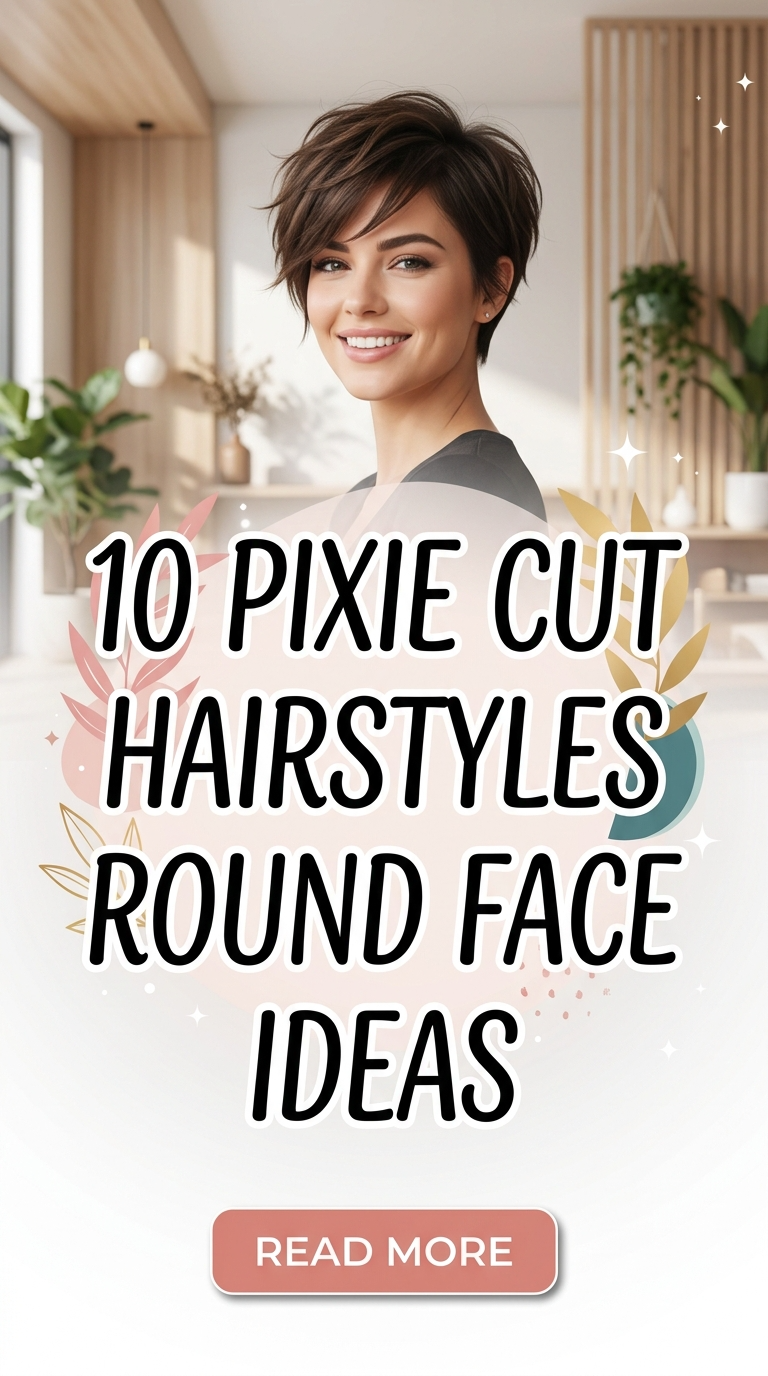
10 Caramel Chunky Highlights on Dark Hair Ideas
Introduction
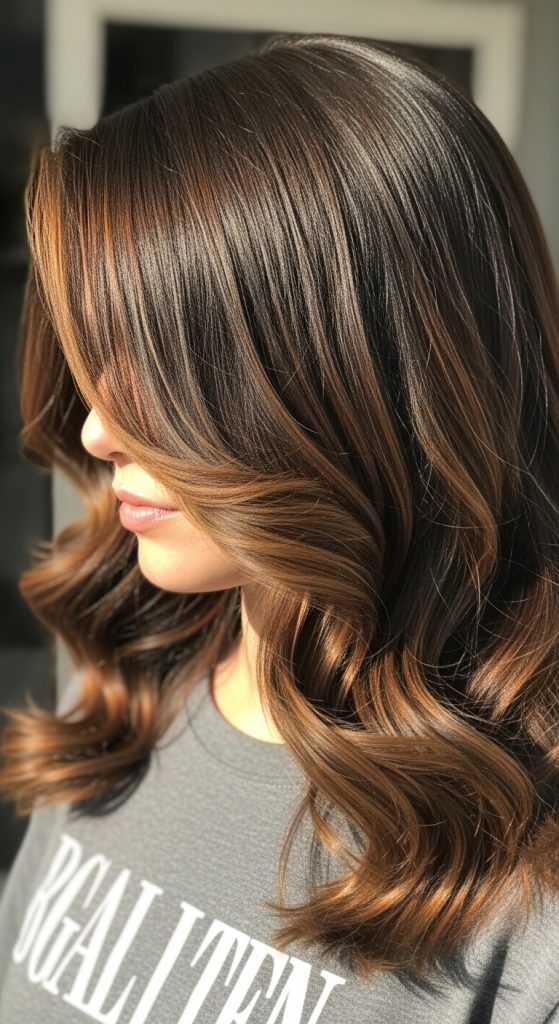
Caramel chunky highlights on dark hair combine contrast, depth, and structured color placement to create a visually defined hairstyle. Pinterest ideas in this category focus on using bold highlight sections rather than subtle blending, making the color more noticeable and impactful. Chunky highlights are thicker strands of lighter color placed strategically throughout darker hair to create dimension and movement. This technique enhances texture while maintaining a strong color contrast that remains visible in different lighting conditions. In this tutorial, readers will learn how to plan, apply, and maintain caramel chunky highlights using step by step methods and accessible materials. These creative ideas are useful for improving hair appearance, adding brightness, and achieving a modern design without fully changing the base color. Each idea focuses on practical application, beginner friendly techniques, and consistent results, ensuring that the final look remains structured, balanced, and easy to maintain.
Why This Idea Is Trending or Useful
Caramel chunky highlights on dark hair are trending because they offer a defined and bold alternative to subtle highlighting techniques. Pinterest inspiration shows how strong contrast can enhance facial features and create a more dynamic hairstyle. The practical value lies in the ability to refresh dark hair without requiring full-color treatment. This approach reduces maintenance effort while still achieving noticeable results. The DIY appeal is significant because the technique can be applied at home using basic tools and materials. Beginner friendly methods focus on sectioning, placement, and controlled application, making the process manageable. Design relevance is evident in the use of contrast and balance, which are key elements in modern design. These highlights also support organization by allowing targeted color application rather than full coverage. Budget ideas are supported since fewer materials are required compared to full hair coloring. This combination of practicality, accessibility, and visual impact makes chunky highlights widely popular.
Materials and Preparation
Preparing for caramel chunky highlights requires organizing tools and selecting appropriate materials. Common materials include hair lightener, developer, caramel-toned color, foil strips, a tint brush, gloves, and a comb for sectioning. These materials ensure controlled application and consistent results. Preparation begins with clean, dry hair to allow even color absorption. Detangle the hair thoroughly to prevent uneven sections. Planning involves deciding the placement and thickness of the highlights to achieve a balanced look. Sectioning the hair into clear parts ensures accuracy during application. Protective measures such as covering clothing and using gloves improve safety. Mixing the color according to instructions ensures proper consistency. Avoid overlapping previously colored sections to maintain hair health. Proper preparation supports a structured process, resulting in evenly distributed highlights that enhance the overall hairstyle.
Idea 1: Face-Framing Chunky Highlights
How to Create
Face-framing chunky highlights focus on placing thicker caramel strands around the front sections of the hair. This design enhances facial features by adding brightness and contrast near the face. The highlights create a structured outline, making the hairstyle appear more defined and balanced. This approach is commonly used to draw attention to the front while maintaining darker tones throughout the rest of the hair. The contrast between the caramel highlights and dark base color creates depth and visual interest without overwhelming the overall look.

To create this style, section the front portions of the hair separately. Apply lightener to thick strands near the face, ensuring even coverage. Wrap each section in foil to maintain separation and control processing. After achieving the desired lift, apply a caramel toner to create warmth. Rinse and condition the hair thoroughly. Style as desired to highlight the contrast. This step by step process ensures a controlled and visually balanced result.
Idea 2: Bold Front Streak Highlights
How to Make
Bold front streak highlights focus on placing prominent caramel sections at the front for a striking appearance. This design creates a strong visual contrast and emphasizes the front layers of the hair.

To achieve this look, isolate two thick front sections and apply lightener evenly. Use foil to separate the strands. After processing, apply caramel color to achieve the desired tone. Rinse and condition thoroughly.
Idea 3: Alternating Chunky Highlights
Step-by-Step Guide
Alternating chunky highlights involve placing caramel strands at intervals throughout the hair to create a balanced pattern. This design ensures even distribution of color.

To create this style, section the hair evenly and apply lightener to selected strands in an alternating pattern. Use foil for separation. After processing, apply toner and rinse.
Idea 4: Underlayer Chunky Highlights
How to Create
Underlayer highlights focus on placing caramel strands beneath the top layer of hair. This design creates a subtle reveal effect when the hair moves.

To achieve this look, section the lower layers and apply lightener to thick strands. Use foil for control. After processing, apply caramel tone and rinse.
Idea 5: High Contrast Chunky Highlights
How to Create
High contrast highlights emphasize the difference between dark hair and caramel tones. This design creates a bold and structured appearance.

To create this style, select thick sections throughout the hair and apply lightener evenly. Ensure the sections are evenly spaced. Tone and rinse after processing.
Idea 6: Chunky Highlights with Layers
Setup Method

This style combines chunky highlights with layered haircuts to enhance movement and dimension. The layers help distribute the color more effectively.
To achieve this look, apply highlights to layered sections, focusing on mid-lengths and ends. Use foil for separation. Tone and rinse after processing.
Idea 7: Side-Part Chunky Highlights
Execution Process

Side-part chunky highlights focus on placing more highlights on one side to create asymmetry. This design adds visual interest and balance.
To create this style, part the hair to one side and apply highlights to thicker sections on the heavier side. Use foil for control. Tone and rinse.
Idea 8: Chunky Highlights with Waves
How to Make
This style enhances chunky highlights by adding waves, which emphasize the contrast and movement of the color.
To achieve this look, apply highlights throughout the hair. After processing, create soft waves using a styling tool. This enhances the visibility of the highlights.
Idea 9: Minimal Chunky Highlights
Step-by-Step Guide

Minimal chunky highlights use fewer sections to create a subtle yet noticeable effect. This design maintains simplicity while adding dimension.
To create this style, select a few thick strands and apply lightener. Use foil to separate. Tone and rinse after processing.
Idea 10: Full Head Chunky Highlights
How to Create

Full head chunky highlights involve applying caramel highlights throughout the hair for maximum impact. This design creates a bold and evenly distributed look.
To achieve this style, section the entire head and apply lightener to thick strands across all sections. Use foil for control. Tone and rinse thoroughly.
Common Beginner Mistakes and How to Avoid Them
Common mistakes include uneven sectioning, over-processing, and incorrect color placement. These issues can result in patchy highlights or damage. Ensuring proper sectioning and timing improves results. Using appropriate materials and following a structured process prevents errors.
Practical Tips for Better Results
Using quality materials improves consistency. Maintaining even sections ensures balance. Monitoring processing time prevents damage. Regular conditioning maintains hair health.
Styling, Presentation, or Organization Ideas
Organizing tools before starting improves efficiency. Styling hair with waves enhances highlight visibility. Maintaining a clean workspace supports better results.
Budget or Time Planning
Chunky highlights require fewer materials than full coloring. Planning the process reduces time. Using basic tools minimizes costs. Regular maintenance prevents additional work.
Creative Expansion and Advanced Inspiration
Advanced ideas include combining chunky highlights with balayage techniques, experimenting with different caramel tones, and adjusting placement for variation. These creative ideas allow personalization while maintaining practicality.